There is a distinct possibility that I have been watching too much Say Yes to the Dress lately. I’m not sure why this keeps happening. I’m already married and never watched the show while I was engaged, but in early December I noticed several seasons of SYTTD on Netflix, and since then, I’ve watched it nightly.
With so much exposure to dresses in every imaginable shape, style, and price, it got me thinking about how a crafty bride might save a few bucks on accents and accessories for her wedding.
When I married my sweet husband, we eloped. I bought a dress online and on sale for a hundred dollars. I had it altered for thirty, and that was that. Aside from having our friends and family there to share the fun, the only other thing that I would have done differently, had we opted for the traditional da-dum-da-dummmm-style wedding, would have been to hand-make it. (The wedding, not the dress.) I like the idea of a wedding with lots of personal touches, and a few frayed edges. Words like, “re-purposed”, “garden-grown” and “saved enough money to buy a house” appeal to me far more than words like “princess”, “crinoline” and “overdraft”. So while watching a new (to me) re-run of you know what, I began to slice up the discarded newspaper from last week, to make a few boutonniere flowers that I would have welcomed at our small ceremony.
Paper flowers are not for an outdoor wedding with a chance of rain. Let’s just get that out of the way now. BUT, for a couple who loves to read, is on a budget, or are just friends of the earth and big on recycling, recycled newspaper flowers are kind of a perfect touch. They are also cute and fun to make.
Here’s what you will need for newspaper boutonnieres:
Weekend Newspaper
Sharp scissors
Florist’s tape
Tacky Glue
Assorted beads and buttons
Sewing Pins (in a variety of colors)
Start with the Sunday newspaper. It usually has lots of colorful ads, photos and features. With your scissors, make small, parallel cuts down the long-sides of the paper. Cut uniform “teeth” down the length of the paper. Next, cut your newspaper perpendicular to the teeth, leaving about an inch of space between the teeth, and where you start cutting. When you have cut the piece of newspaper completely, it should resemble a comb. 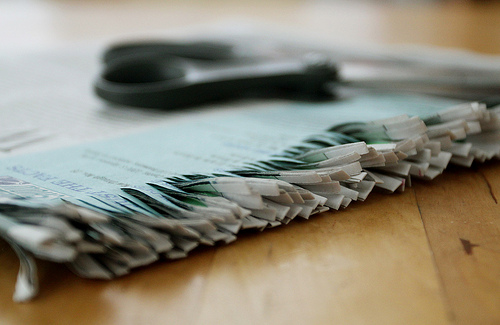
Next, cut another strip of newspaper about one inch by 5-12 inches long depending on how deep your “teeth” cuts are. Deeper cuts make bigger flowers and require a longer center. Then, fold that long paper strip in half (length wise). This will be the center of our flowers. 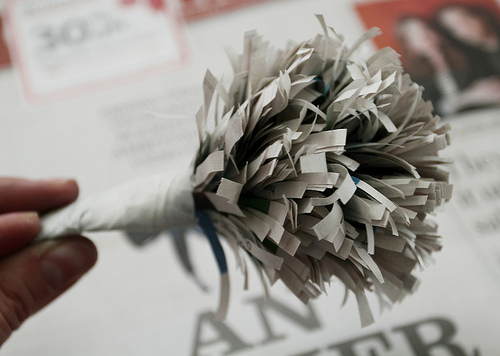
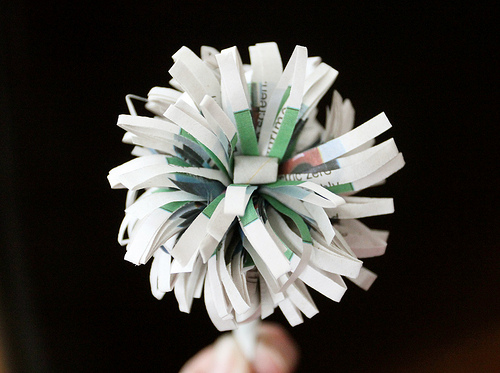
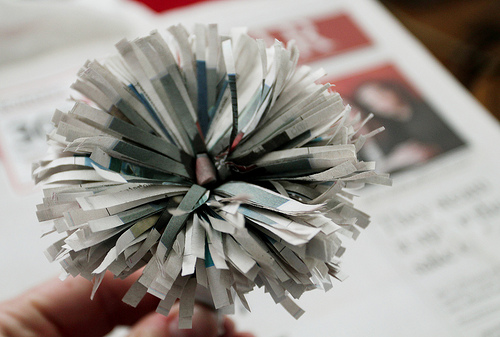
Take one end of the snipped newspaper (the comb-shape), and wrap the paper, with the most colorful paper “teeth” wrapping in on themselves, around the paper center. Wrap three or four times, and secure with floral tape. Locate the center-fold, and with your thumb, gently press the “teeth” now known as, “petals” open. 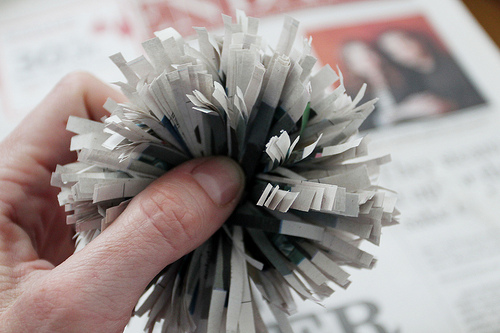
Select a button or bead to your liking and tacky glue it to the center of the flower- with the hole of the bead facing straight up. Now insert the sewing pin into the hole, to secure the bead, and further stabilize the flower. If the pin pokes through the floral tape, take another piece of tape, and wrap it around to ensure that no newspaper stems are showing, or unwanted pin tips. 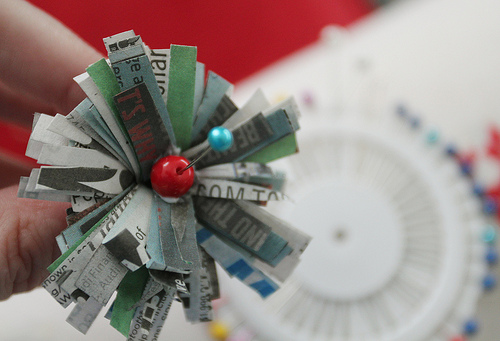
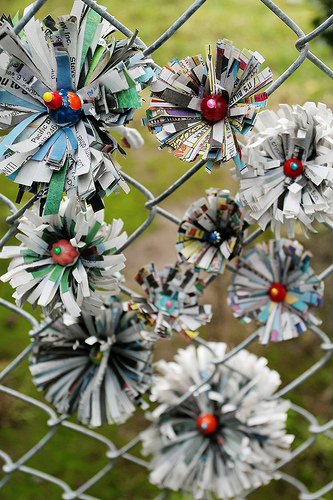
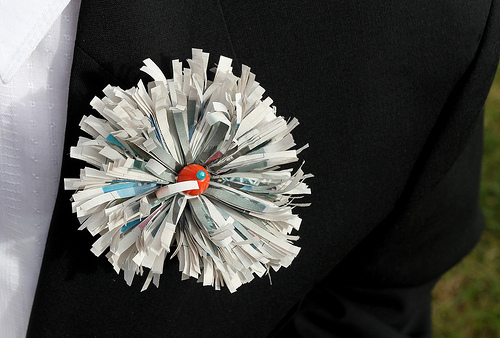
Let the glue dry, and with a florists pin (or sewing pins) attach the boutonniere to the handsome groom, or crafty bride. The possibilities are endless with these flowers. Wear them in your hair, string them up as a garland, or arrange them in a vase. They are so cheery, lightweight, and fun for any occasion. Even if it’s just watching SYTTD in your hundred-dollar wedding gown while eating lunch…
I happen to know a handful of lovely girls who are engaged right now, and if any of you are reading today, I have a list of other wedding crafts I’ve been rolling around in my head- including a tutorial on boutonniere and bouquets with real flowers. Stay tuned for more my friends… 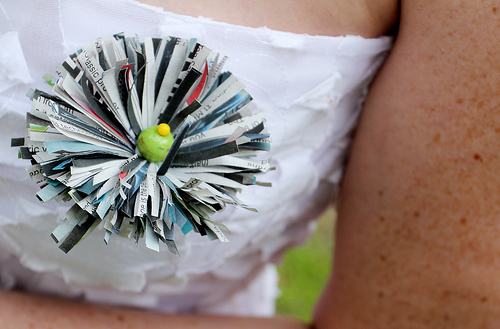
And to the rest of you, thanks, as always for reading. The comments are always a treat to read, and I appreciate them always.


Any ideas for DIY printables for a dessert table? I’m a creating one for a black/white/red themed birthday party and I need to create cards for each treat.
Hi Beryl. Have you seen this site? http://www.bridescouts.com/2010/03/29/di-the-grocery-store-dessert-bar/ Might be some ideas in there you can apply to your dessert table Good luck!
Love this idea! I’ve always loved handmade stuff for weddings. I did some things for my own wedding, but didn’t organize them all into something coherent that I was very happy with in the end. Oh well. I can help with other people’s weddings now!
Catherine, I bet your wedding was beautiful! You are so talented
Re-posted on my site. Nice job, lovely!
http://www.sarahlaynephotography.com/blog/2011/01/06/featured-wedding-crafts-by-megan/
Thank you Sarah! I love love your blog, and am honored to be featured! Thanks again! xoxo
PS Readers- Sarah is the BEST wedding photog ever – check out her site!
Great idea! Now I know what to do with all the store papers I keep getting
I L-O-V-E these, Megan, and linked this post on my blog here: http://strungbycolor.blogspot.com/2011/01/recycled-christmas-cards-part-ii.html
I’m always looking for new tree-hugging ways to re-use things and create less waste. Thanks for the inspiration.
Thank you Francine! Enjoy
StrungByColor, thank you SOOOO Much! I appreciate the link, and am so happy you like the idea Happy crafting!
xo
radmegan
This is a cute idea…I wish I would have thought about making things for my wedding I would have saved a lot of money.
What a great idea! Thank you!
Very cute. I love making things from any kind of paper. Im a new follower and love the things I have seen so far. Come check me out at funkymomcards.blogspot.com
@Breaking Free From Old Ways- This would be a nice accent for a birthday party or anniversary too! Thanks for the comment (and I bet your wedding was lovely!)
@ViSart-DaLi Claying Mama- Thank you so much!!
@Leasa- Thank you! Me too! I appreciate the follow, and am going to check out your blog right now!
xoxo
radmegan
Wonderful idea! That newspaper flower is so cute! Thanks for the inspiration. Love your blog so much!
Thanks so much!! Totally appreciate that
These are so pretty and original, the beads a that finishing touch.
That is all paper! Yes, it is true. This amazing job! Thank you for sharing this. Very inspiring. I can cut all of the paper flowers I need to make this realistic looking bouquet. Great post!
Coronation outbreaks virtually lockdown across the country. In the big cities, including the capital, the working people and the working people are helpless.
It is difficult for them to provide double food. The same picture applies to lower middle class and middle class families.
In the meantime, house rent has become the name of the new panic. Most of the houses in the capital are owned by their tenants
Pressuring to pay rent. There have also been reports of evictions of tenants in several places. These low-income, helpless people are looking at the government’s decision. They say,
If the government’s executive order does not waive or suspend the rent for the time being, there will be no option to leave the house and go to the streets.
An organization called New Dhara Bangladesh is on a hunger strike in front of the National Press Club demanding waiver of rent. Please visit for details. http://www.thedailyreport24.com
Your content is very informative we also provide a service in Australia
our website name Signature chauffeur
if you want any services you can check it out