• Home
  • About Megan
    • Student Gallery
  • Writing
  • Video Training
  • Knitting Fork Projects
  • Categories
    • Baby Crafts
    • Baking
    • Book Review
    • Camping
    • Cooking
    • Crafts
    • Etsy
    • Gardening
    • Guest Blogger
    • Holiday
    • Kid Crafts
    • Knitting Fork
    • Needle Felting
    • News
    • Photography
    • Recipe
    • Sewing
    • Teaching
    • Travel
  • Sponsorship Info
  • Contact
  • March 29, 2023
Gardening Recipes
 
Craft Projects Photography

Going Green with Wrapped Baskets

March 8, 2012 By radmegan 25 Comments

Things have been really busy here at radmegan HQ. I am teaching my Needle-Felted Peeps class at the Urban Craft Center this weekend, my 3 workshops at Craftcation are just around the corner, I have two upcoming television appearances (more on that soon!!) a few really fun commissions that I’m working on at night, and I’m traveling a lot for a new crafty client I’m working with. So many great things in the works. I’m feeling very blessed. I’m also feeling like I need things in my personal life to be as tidy as possible so that I won’t get slowed down or distracted. 
Which brings me to today’s project. Full disclosure: The photo below is what our laundry room shelf has looked like for almost two years. This week, I went to grab one bag and the entire shelf almost came down on me because there were SO MANY PLASTIC GROCERY BAGS stuffed into a teeny tiny space. 
In a fit of rage and craftiness, I pulled the entire bundle down and decided to make SOMETHING USEFUL from the bags that had been cluttering up our hall for so long. In a wild moment of clarity, I flashed back to a small woven pot that I had made during my brief stint as a Girl Scout. I grabbed my cutting mat, a cutting blade, a ruler, some masking tape, a heavy yarn needle and crochet hook. I was going to weave a basket out of all these plastic bags. 
 
The plan started coming together rather quickly. Plastic grocery bags are easy enough to smooth out. I used my ruler to cut each bag into three strips. The two handles became long strips, and the middle section became a third.

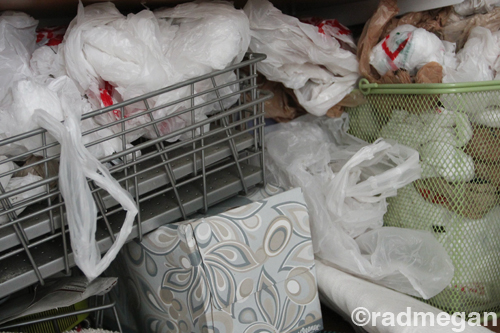
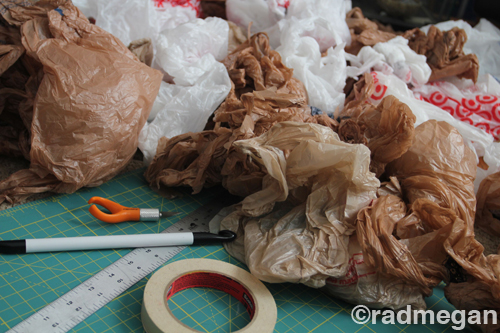
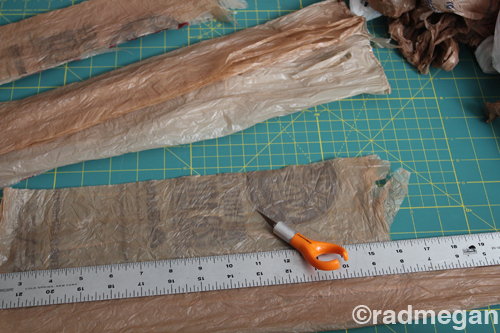
I arranged the strips of plastic into piles according to color and size. Since the plastic bags are so prone to static electricity, I placed several dryer sheets between the piles so that they would stay in place. 

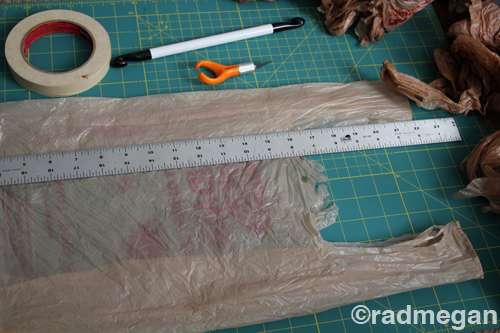
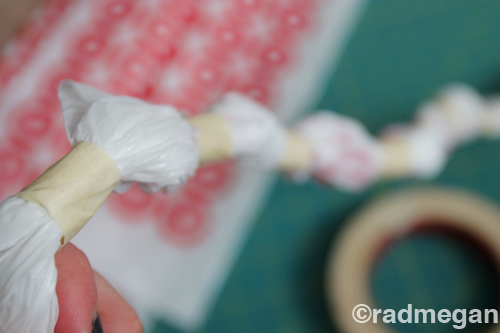
I decided that since I had so many white plastic bags, I would use those at the inner cord of my basket. I really wanted my entire project to be made of recycled materials. I took un-cut plastic bags and twisted them in my hands until they were about a half an inch in diameter. Then I took masking tape and put small pieces (about an inch of tape) around the twisted plastic to keep it from unraveling, and to help keep the size relatively consistent. 


To add length to the cord, I would simply twist more bags together and tape them down. The inner cord got pretty long, pretty fast. 

Once I had about five feet of white plastic cord, I took the strips of tan and brown plastic and started to tightly wrap them around the end of the inner cord. 
To begin the basket shape, I wrapped strips of brown plastic around the white center cord. When I had about 3-4 inches of inner cord wrapped in brown, I bent my center cord until it was shaped like a lowercase letter “g”. I tried to keep the hole inside the g-shape as small as possible.
I threaded pieces of brown plastic through my heavy yarn needle and wrapped the coil of white plastic with the brown plastic. As I did this, I wrapped the coil around the g-shape so that a spiral began to form. 

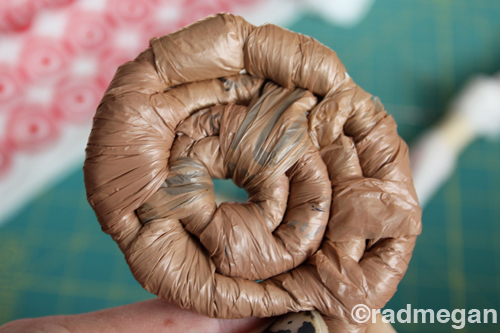
To keep the outer coil connected to the inner coil, I would wrap the white plastic in the brown about 5 times, and then use my needle to push it through the layer below. It took a while for this to feel natural again (it’s been a LONG time since I was a Girl Scout) but eventually I got in a rhythm. Wrap, wrap, wrap, wrap, thread over and through the layer below, wrap, wrap, wrap, wrap, thread over and through the layer below…

I used trace amounts of masking tape to hold the brown plastic down on the white cord when I needed to re-thread my needle. To prevent the tape from showing, I would wrap a little more brown over the taped area before continuing.

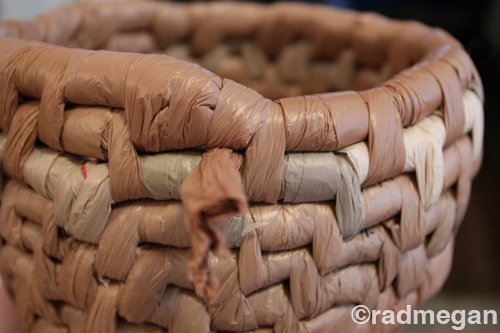
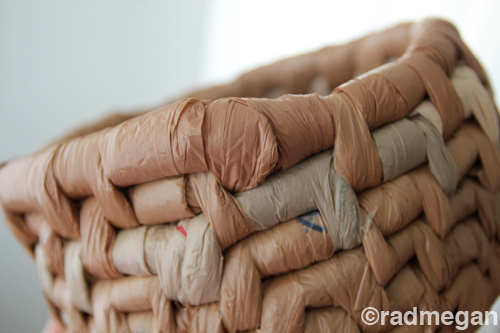
As my basket base progressed, I started to incorporate additional colors into the design. 

I also had to keep adding length to the inner cord as my basket grew in size.

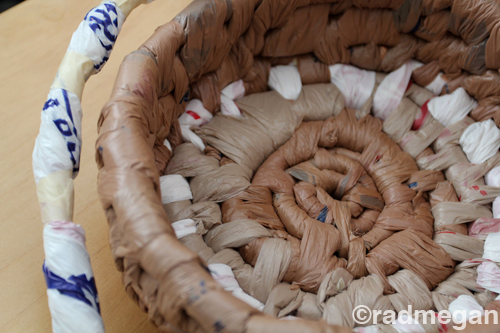
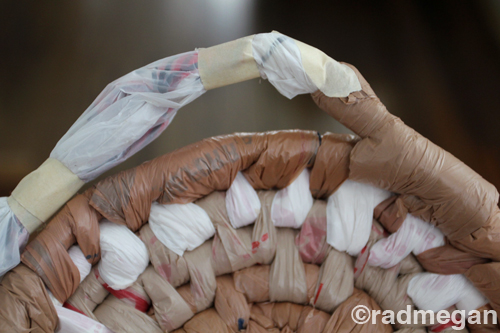
When my the base of my basket was as large and I wanted it to be, I wrapped the next coil in the same way as I had all the rest, only starting on TOP of the previous coil, instead of next to… 

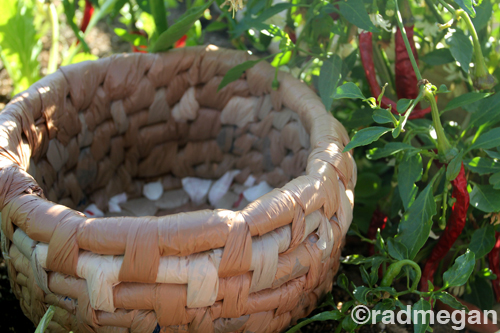
In about four hours, I had a medium sized basket!

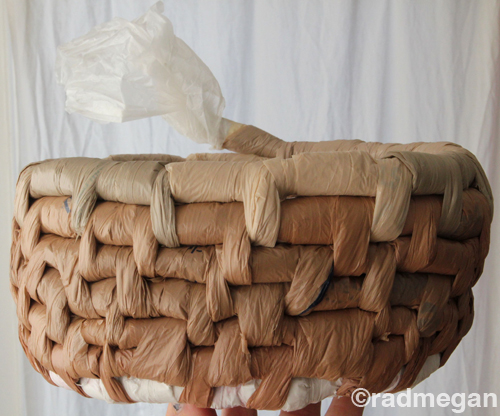
When the basket was the size I wanted, I taped off the end and tightly wrapped my last few layers of plastic over it and the layer below.


I tucked the end of the brown plastic under one of the previous loops, hiding the loose end, AND allowing me to re-open the basket if I ever want to add more size to it!

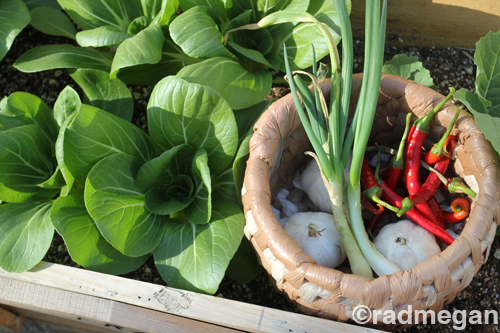
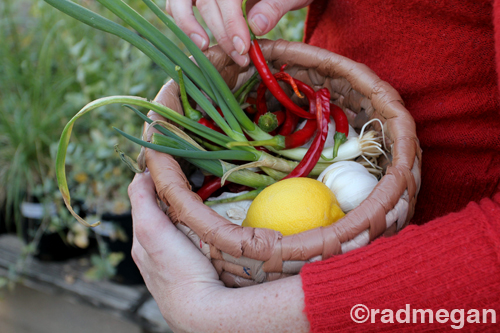
I have to say that I am really pleased with this basket! Since it’s made entirely of plastic bags, it is a a terrific companion in the garden, great green gift for your little one (hello homemade Easter Basket!!), and it’s just a really fun craft to help you un-clutter your life! I used mine to harvest a few odds and ends in the garden… 

And then put it back on my formerly frightening shelf in the laundry room! Once that handmade-plastic-bag-basket starts overflowing, you can bet your boots I will be making another one! Or, I might even continue building up the original!
Either way, I feel a lot better knowing that the plastic bags I’ve been holding onto have become something useful (and cute!) instead of clogging up a landfill OR clogging up my home/life!


FacebookTwitterGoogle+PinterestShare

Related posts:

magazine+cupcakes+copyPom-Pom Cupcakes for Kids Craft 123 Traffic Cone Goodie Bags for a Truck Party Natural Egg Dye: A Sneak Peek! Needle-Felted Venus Fly Trap! Making a Fabric Locket 3615485151_a8b7c861e5My new love: The Junkyard

Filed Under: Crafts Tagged With: green, original radmegan craft, recycling


Warning: count(): Parameter must be an array or an object that implements Countable in /webroot/r/a/radme001/primary/www/wp-includes/class-wp-comment-query.php on line 399

Comments

  1. Anonymous says

    March 8, 2012 at 1:06 pm

    I want to learn how to do this! A great basket for giving away fruit etc. Love this so much, but might need a private lesson. If you ever need me to travel with you, I’m ready. Finished work this week. Now I can retire again. love you, come visit us soon. love, mom

    Reply
    • NINI des Ruelles says

      October 10, 2020 at 1:39 am

      jaime ce projet …magnifique bravo

      Reply
  2. Cassandra of Pooknflip says

    March 8, 2012 at 2:00 pm

    This is so friggin awesome! I mean RAD! Lol. I love that you’re into upcycling stuff too. I’ve got a couple crocheted plarn bags I’m working on (I talked about them on my blog – here’s the start of it all: http://www.flightofthepook.com/2011/03/girlie-night-cooking-plarning-party.html) But I’ve been wanting to make baskets – something heavier duty – and I was worried that my method wouldn’t lend itself to something as thick and sturdy as a basket. And then here comes RadMegan in all her crafty awesomeness… 😉 Thanks for the tut! I will be trying this for sure!!

    Reply
  3. Sara Eaker says

    March 8, 2012 at 3:23 pm

    Oh my-these look so awesome. I love the look and idea! When do you sleep, my crafting queen? XO

    Reply
  4. Amy says

    March 8, 2012 at 6:25 pm

    Love this idea–our laundry closet usually looks just like your before picture. And I’m totally looking forward to Craftcation–hopefully I’ll make it to one of your classes!

    Reply
  5. Kat says

    March 10, 2012 at 4:06 am

    Very, very excellent project and once completed, is totally functional, and that’s great! Thank you for sharing this valuable idea!

    Reply
  6. Anonymous says

    March 11, 2012 at 3:04 pm

    love this I would love to do this!! Yours is so beautiful! Great

    Reply
  7. becky says

    March 11, 2012 at 3:56 pm

    I am curious how many bags you used. Were you counting? I love this idea, but don’t think I have enough bags collected.

    Reply
  8. Anonymous says

    March 21, 2012 at 8:13 am

    In progress right now in making one!!! Think i’m going to need more bags!! Great idea for recycle use!!

    Reply
  9. aysecehayaller says

    May 1, 2012 at 2:37 pm

    ELLERİNİZE SAĞLIK ÇOK GÜZEL OLMUŞ HARİKA . VERY NİCE ((:

    Reply
  10. Kim Curic says

    November 26, 2012 at 11:12 pm

    I stumbled upon this when looking for a tutorial on making plastic bag baskets. Thanks. Its awesome

    Reply
  11. MommyLibrarian says

    December 4, 2012 at 9:04 pm

    I started saving bags to make this….I think I have enough to make 3 or 4. They add up fast.

    Reply
  12. Gemma says

    March 22, 2013 at 4:30 am

    I had a huge pile of plastic bags taking up space at home and was looking for something crafty to do with them. Thank you for writing about how to do this! My pile of bags is now steadily being used up :)
    I posted my attempts at making coasters on my blog, and referenced your tutorial because it was really easy to follow! http://makeitbakeitdigit.wordpress.com/2013/03/22/plastic-bag-weaving/

    Reply
  13. Clarissa says

    January 23, 2015 at 7:17 pm

    I was wondering if you could do a video on this?

    Reply
  14. Anne Fraser says

    April 18, 2016 at 12:43 pm

    Hi, I came across your post on Pinterest. It’s great that you are all doing something with those plastic bags instead of just throwing them out. Not wishing to be rude, but what if you start taking your own cloth bags to shop – you would save getting all those bags. One cloth bag can save about 1,000 plastic bags in its lifetime :-)

    Reply
  15. Longchamp Bags says

    August 15, 2016 at 1:43 am

    always i used to read smaller content that also clear their
    motive, and that is also happening with this post which I am reading here.
    Longchamp Bags recently posted…Longchamp BagsMy Profile

    Reply
  16. Salomon Shoes says

    September 9, 2016 at 9:10 pm

    Pretty component to content. I simply stumbled upon your site and in accession capital to claim that I acquire in fact enjoyed account your weblog posts.
    Anyway I will be subscribing on your feeds
    or even I achievement you get right of entry to constantly quickly.
    Salomon Shoes recently posted…Salomon ShoesMy Profile

    Reply
  17. Shoaib Ahmed says

    March 25, 2017 at 2:18 pm

    I cant rave enuf about ur fantastic idea. Its sad that u r busy making more of these baskets n dont seem 2 hav the time 2 answer ur admirers! ? I loved the suggestion about a video tutorial. Also pls cud u specify the time it takes 2 make this basket from start 2 finish n how many bags it wud take? Pls cud u also suggest sumnuse 4 the big shoppers? 1 suggestion on how 2 cut down on the no. of shoppers…just fold them n take them in ir purse 2 the particular shop they came from n ask them if u cud reuse them 2 carry their stuff home…..

    Reply
  18. news kapil sharma says

    October 21, 2017 at 8:04 pm

    Be wary of offers that sound too good to be true, given that they probably are.
    But as a bonus professional website marketing team can create for you
    personally your review website, where you should be able to sell
    your personal affiliates products. Quick, to the level, and accessible from the several devices, sending electronic messages means
    to be able to speak with someone at any hour.
    news kapil sharma recently posted…news kapil sharmaMy Profile

    Reply
  19. OfwfzFFTDiqHfqW says

    November 6, 2021 at 1:15 am

    dAaEZHIxLZothZinkR 8513

    Reply
  20. GrannyGeek says

    February 2, 2022 at 9:42 am

    Thank you for serving as midwife to an idea that’s been rattling around my imagination for ages. I just didn’t know what to use as filler. I’ll probably use bread bags for that.

    Reply

Trackbacks

  1. Eco DIY Projects for Recycled Plastic | Sprout Watches Blog says:
    October 16, 2014 at 3:54 pm

    […] DIY projects with plastic bags include plastic bag bracelets, plastic bag yarn for crocheting, and woven plastic baskets to store organic produce. Not only will you be making great use of your unwanted plastic bags, but […]

    Reply
  2. Little House Inspired Family Fun Crafts and Activities says:
    January 9, 2015 at 2:12 pm

    […] to embrace the repurposing and reusing spirit of the Ingalls family, here’s a fun tutorial by Rad Megan that uses plastic grocery bags to create the woven […]

    Reply
  3. 15 cosas que podemos hacer con las bolsas de plástico en vez de tirarla a la basura - says:
    April 18, 2015 at 2:43 pm

    […] Fuente […]

    Reply
  4. Here Are 20 Epic Things You Can Do With That Pile Of Plastic Bags In Your House | Viral.my.id says:
    April 21, 2015 at 5:30 am

    […] Read a full step-by-step here. […]

    Reply

Leave a Reply Cancel reply

Your email address will not be published. Required fields are marked *

CommentLuv badgeShow more posts

Follow Me

  • 
  • 
  • 
  • 
  • 
  • 

Find posts on this blog about…

Instagram

Get posts via email

Welcome!

I'm a crafter, cooker, gardener, and photographer.
Read More...
Learn Craft Photography with Radmegan

Friends

back to top
© Megan Andersen Read. All rights reserved.
Interested in using my photographs? Contact me.
Web design by Hearts and Laserbeams