• Home
  • About Megan
    • Student Gallery
  • Writing
  • Video Training
  • Knitting Fork Projects
  • Categories
    • Baby Crafts
    • Baking
    • Book Review
    • Camping
    • Cooking
    • Crafts
    • Etsy
    • Gardening
    • Guest Blogger
    • Holiday
    • Kid Crafts
    • Knitting Fork
    • Needle Felting
    • News
    • Photography
    • Recipe
    • Sewing
    • Teaching
    • Travel
  • Sponsorship Info
  • Contact
  • June 15, 2025
Gardening Recipes
 
Craft Projects Photography

Making a Fabric Locket

February 8, 2011 By radmegan 4 Comments

Done!
I’ve been rolling the idea of a hand-crafted locket around in my head for about a month now. I’ve tried making lockets out of all kinds of paper, craft foam, even aluminum foil- but nothing has worked out the way I envisioned it. Truthfully, I’m not great at sewing, so I kept putting a fabric locket off …until now.
Peek!
While this locket isn’t the most beautifully crafted, I feel like it’s successful enough to share with you here. I mean, I would wear it. What I like about it, is that I re-used both an old wool top that wasn’t flattering, AND a left-over holiday card that I never mailed. Yay for recycling! So without any further hesitation, here’s how I put together my fabric locket pin:
Re-Using Old Holiday Cards

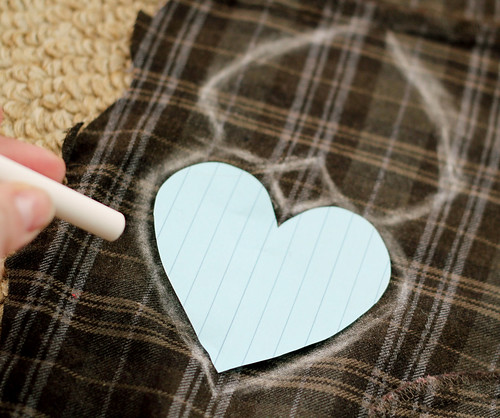
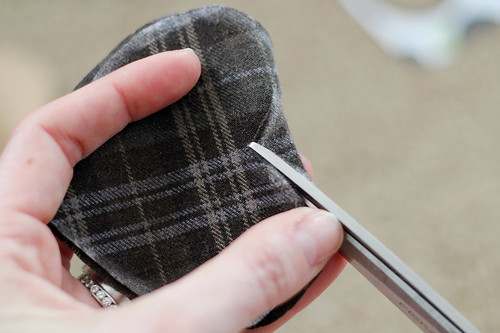
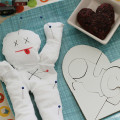
After collecting my potential materials, I started by drawing the chalk outline of two hearts (connected at the curve) onto my wool blouse.

Chalk Outline

Next, I folded the heart in half (keeping them connected), and trimmed away the excess fabric.

Snip Snip

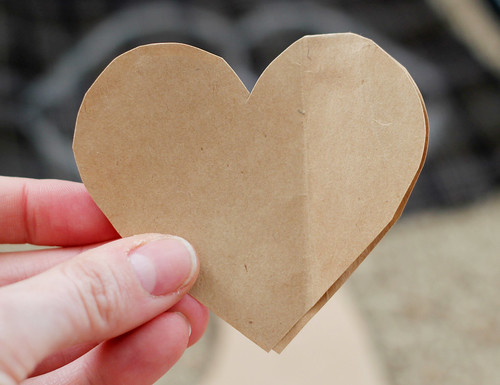
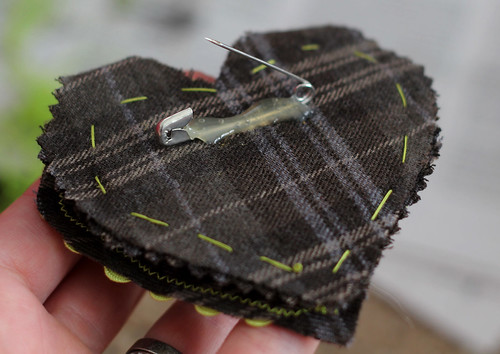
I wanted the back of the pin to be sturdy and strong, so I cut out a paper backing from a grocery bag. At first, I wasn’t sure exactly where the paper backing was going to go, but I knew that in order to keep the heart pin upright it needed support.

Paper Backing

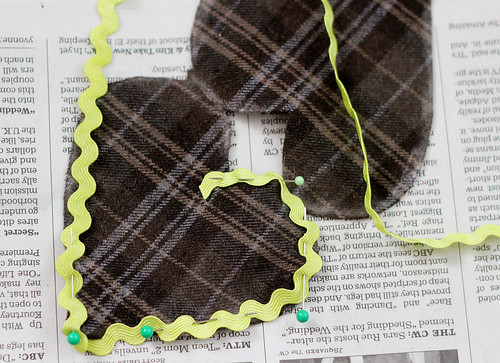
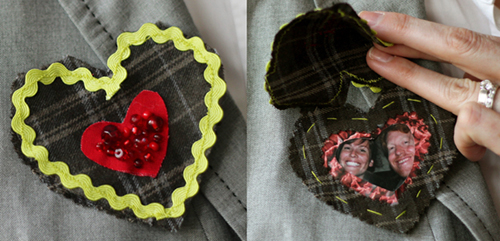
While I figured out the configuration of the inside of the locket, I pinned down green rickrack trim all around the lid…

PInning

and sewed it in place. Sewing
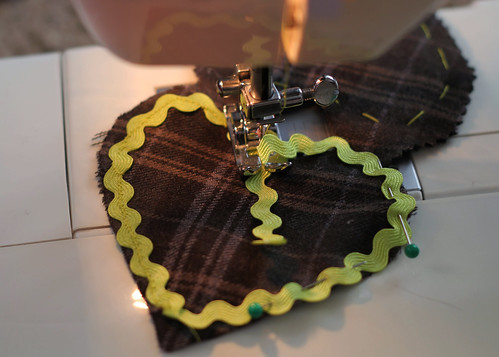
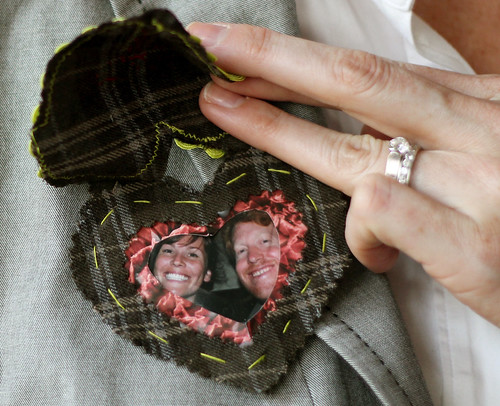
Next up, I hot-glued the paper backing down onto the inside of the locket. Originally, I had thought I could place my photo onto the paper, and then sew another piece of wool directly atop the photo, but my sewing machine jammed while I was attempting this, and almost ruined yet another locket! Instead of scrapping the entire project for good, I ripped out the thread, and found a colorful and glossy catalog in my pile of mail. I cut out two heart halves and glued them down over my sewing mistake. Next, I cut out another wool heart to cover up the paper backing, and most of the colorful catalog paper.  I cut out a small heart-shaped window from the wool, and hand-stitched it onto the glossy paper accent.

Covering up a sewing mishap...

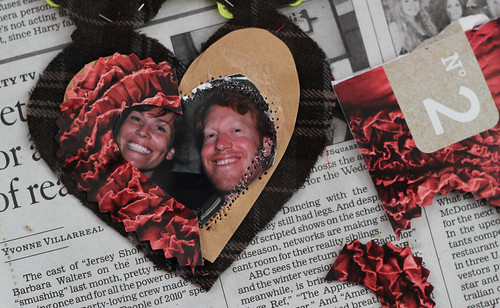
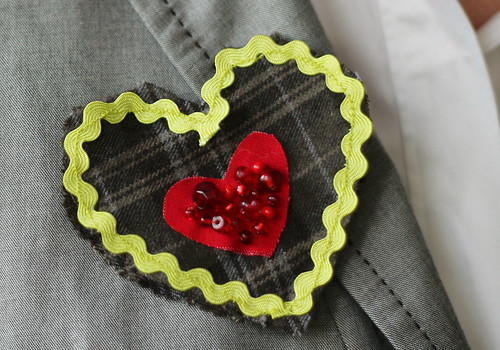
Finally, I sewed a little red fabric heart on the front lid of the locket, and sewed in an assortment of beads to give it a little more sparkle. Afterwards, I secured a safety pin to the back of my piece. The fabric locket was finally complete!

Glued!

What I like about this locket, is that it’s cute enough to pass for a stand-alone pin. Not everyone needs to know that there’s a photo inside of me and my hottie husband.

I think there’s probably a lot more I could do to push the basic design of this locket, but I’ll save that for another day. Today, I’m off to the farmer’s market to buy some fresh produce while wearing my newly crafted fabric locket pin!

FacebookTwitterGoogle+PinterestShare

Related posts:

Travel Crafts: Making Paper Beads 5435321598_d06a129994Anti-Valentine’s Day: Crafts, Games, Recipes! IMG_1866+copyKnitting a Jute Satchel Guest Blogger Thursday: Top 5 Sewing Tools somanyflatsCraft: Sewing a Buckwheat Hull Squirrel Pillow 5020768820_5af63cbe85Craft: Cashmere Birds From an Old Scarf

Filed Under: Crafts, Sewing Tagged With: accessories, beads, Crafts, heart, locket, Love, Photographs, pins, recycling


Warning: count(): Parameter must be an array or an object that implements Countable in /webroot/r/a/radme001/primary/www/wp-includes/class-wp-comment-query.php on line 399

Comments

  1. Leasa says

    February 10, 2011 at 10:03 pm

    Wow you are so creative. I love this locket.

    I also wanted you to know I gave you the stylish blogger award go check out the post here http://funkymomcards.blogspot.com/2011/02/stylish-blogger-award.html

    Reply
  2. radmegan says

    February 15, 2011 at 1:03 pm

    Oh my god THANK YOU!!! Im so honored :)

    Reply
  3. Jamie @ Locket Jewelry says

    August 25, 2011 at 12:49 pm

    This is such a fun way to make use of things you already have but don’t know what to do with them! I’ve found that homemade/recycled products (surprisingly) come out better than the “real deal.” Keep up the fun/creative ideas!

    Reply
  4. dPuVqFkyKmMXmMY says

    November 6, 2021 at 1:38 am

    ZFVAyMborYvnmFGmIt 8392

    Reply

Leave a Reply Cancel reply

Your email address will not be published. Required fields are marked *

CommentLuv badgeShow more posts

Follow Me

  • 
  • 
  • 
  • 
  • 
  • 

Find posts on this blog about…

Instagram

Get posts via email

Welcome!

I'm a crafter, cooker, gardener, and photographer.
Read More...
Learn Craft Photography with Radmegan

Friends

back to top
© Megan Andersen Read. All rights reserved.
Interested in using my photographs? Contact me.
Web design by Hearts and Laserbeams