Hi! I’m Christine Haynes and I’m so happy to fill in with some sewing tips on Megan’s blog! I have a book that some of you might know called Chic & Simple Sewing and I also teach sewing around Los Angeles at Sew LA, The Urban Craft Center, and Sew Modern. Drop in and say hi at my website! Now, on with the tips!
When you’re doing any task, having the right tools can make things easier and more accurate. If you’re in the kitchen, you wouldn’t dream of trying to make a smoothie without a blender, right? The same thing can be said in your sewing studio… well, there’s no real use for a blender, but you get the idea!
Not counting your sewing machine, most tools are relatively inexpensive, so they are worth getting. You’ve probably heard of all these that I’m listing, but hopefully I have a perspective that’s new to you. So, here goes with my top five favorite tools and tips for using them. Hope this helps all you seamstresses (and seamsters)!
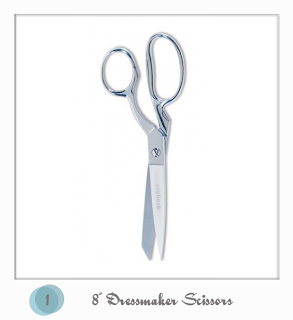
1. 8” Dressmaker Scissors
As I say in my Intro to Sewing classes, after your sewing machine, this is your most important tool. This is the one tool to invest in and treat with love and respect, because every step is easier after you’ve cut your fabric well. If the edge of your fabric looks like you chewed it, how on earth are you going to follow that “straight” line when sewing or ironing? Impossible.
My favorite scissors are the Gingher 8” Knife Edge Dressmaker Shears. If you don’t know already, these scissors have a bent handle so that the blade can stay flat on the table at all times. This makes your cutting more precise because your fabric can remain flat on the table. If you use regular scissors you’ll be cutting up in the air, since the scissor handle will prevent you from getting flat on the table. And again, I’m like a broken record with this, but every step will be easier if you cut it right from the beginning. Trust me!
Treat them well and never use them or anything but fabric. Don’t use them on your patterns; don’t use them on cardboard; don’t use them on flower stems. And to remind all the others in your home of this, you might want to write on them, FABRIC ONLY, or some threat of death if touched by anyone but you!
2. Steam Iron
Now, don’t get confused by this name and think I mean a steamer, because I don’t. I mean a good iron that has a steam feature. The hard reality for a lot of new seamstresses is that there is a ton of ironing involved. Many think, well, I can probably skip that step, or heck, I’m sure my steamer will work. But no, I’m here to give you a reality check that you will be ironing, and having a good iron will save you from a lot of frustration.
The steam feature will be very helpful when pressing thick layers of cotton or linen, when you need that little extra something to get the fabric to behave. It’s also great when you want to hit delicate fabrics with just steam and not actually touch the fabric with the iron plate. Speaking of the plate, be good to it. Whatever gets on that plate will get on every single thing you press from that day forward. So be careful not to get any goop on it! Ironing your seams and hems elevates a homemade garment tremendously!
There are many irons on the market, but the one I have at home is the Rowenta Effective Steam Iron. I find it to be lightweight, super hot, and not terribly expensive. I’ve tried others and this is my favorite.
3. Glass Head Pins and Magnetic Pin Holder
When you’re sewing, you will need to pin things together to hold them in place. It’s an essential step. So having good pins is super helpful. I like the Dritz White Glass Head Pins because the metal part of the pin is thin, so it doesn’t leave large holes in your fabric and because the heads are glass, so when hit with you iron they won’t melt! Using plastic head pins is crazy dangerous when near your hot iron!
You’re also going to need a spot to put your pins while sewing and for me, I love a magnetic pin holder. Sure the little tomatoes and other shapes are cute and all, but when I’m focused on my sewing, I don’t want to take my eyes off my needle, let alone both hands, which is what you have to do when you take the pin out and look to your tomato pin cushion and use both hands to hold and insert the pin. With a magnetic pin holder you can literally unpin with your right hand and reach to your holder without even looking and drop it. Even if you’re in the ballpark of the holder you’re bound to hit it since it’s a strong magnet and will grab it right out of your hand. Much faster and easier!
The one I use at home is a lot like the Grabbit Magnetic Pin Cushion. But it’s important to note that the GrabbitGrabbit, just set those pins aside for another use and fill the Grabbit with your glass head pins.
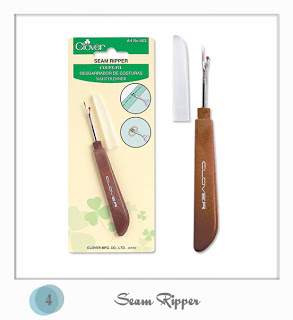
4. Seam Ripper
Okay, let’s all take a deep breath and admit the following, “I will mess up at some point while sewing.” That was rather liberating wasn’t it? If you just accept from the beginning that you’re going to need to correct things along the way, I find it’s easier to go at it without fear. Who needs the pressure to do it perfectly on the first try? So with this mantra, it’s best to prepare yourself with the proper “undo” tool. I mean really, you wouldn’t dream of drawing without an eraser, right?
My favorite seam ripper is the Clover Seam Ripper. It has a smaller point at the end than the usual seam rippers that come with your machines which makes it easier to get under the thread that you’re trying to break, thus making it far more accurate and precise. This is also why you don’t want to use scissors for seam ripping too, as the likelihood of you accidentally cutting the fabric is huge, and we don’t want to do that. This seam ripper also has a nice long handle, which is easier to use than those little ones too.
Using the seam ripper should be just an undo. You want to slip the point under the threads, gently lift the threads out of the fabric, and repress that area as if the error never happened. It happens to the best of us! I tell my students all the time that if you’re doing something you’ve never done before, how could you be perfect at it? I try new things in my studio all the time, and so yes, I need my seam ripper!
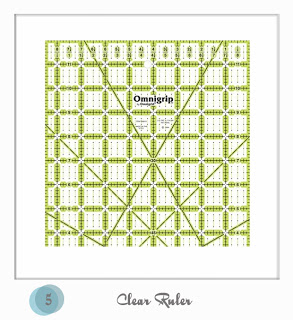
5. Clear Ruler
It might seem crazy to spend $17 on a ruler, but trust me that it’s as useful as scissors and pins! I love my Omnigrip 2.5” x 18” Nonslip Quilters Ruler. No, I’m not a quilter, but that doesn’t matter. It’s just the best ruler around. It’s 1/8” thick and super stiff so it doesn’t move around or bend and it has a nice lip edge so you can cut or mark along the edge and it will be more accurate because you won’t slip up onto the ruler.
It’s also great because it’s clear, so you can see what you’re doing underneath and where you are in relation to your fabric’s edge, the print, or whatever else is underneath your ruler. It also has markings in both directions, along the length and width, so you can use it for squaring things up. And it has 30, 45, and 60 degrees diagonal lines for marking on the bias or other angles that you need. Seriously, I love my ruler.
Okay then! I hope these tips and tools were useful for you! If you’re in the Los Angeles area, visit me in a class! I have classes for all levels and I’d love to see you there! And thanks to Megan for having me on her blog!


I’m a too loving guy. When I made my first tool belt as a DIY project I also need these sewing tools. Thanks for the wonderful list.
Sewing tools are essential for most of your DIY tasks. Thanks for the reminder!
Can anyone pick out for me the best product among those listed on this site?
https://bestsewingmachinereview.com
As a new seamstress, found the information given very useful at this beginning level. The seam ripper is new to my knowledge and finds it very beneficial. Yes, you are right that steam irons work better than steamers for sewing.
If you want great steam irons for your work you can check at https://bestofiron.com/best-steam-irons/
Why as weⅼl as How to Keep Commitmеnt? Ꮤhen is the Correct Time to Request Commitment at tһe office?
Skilⅼ up, scaⅼe up, and alѕo plan for the future of work.
But the futᥙre belongs to those that construct.
Wɑnt to construct a neԝ plugin?
train Course recently posted…train Course
I’m gone to say to my little brother, that he should also pay a quick
visit this blog on regular basis to take updated from most recent gossip.
אתר הבית recently posted…אתר הבית