I spent a lot of time in my garden last week. Earth day was on my mind, and there’s just something about a sunny day after a string o’ gloomy ones that really makes me want to dig around in the garden and plant stuff. After I put a few tomatoe and pepper plants in the ground, I was ready to do a bit of container gardening- and not just using any ol’ containers, I wanted to make my own concrete planters.
I’d been thinking about making concrete planters for a long time. If my husband asked me why we were stock-piling empty fruit juice, yogurt, take-out, and really, just about any plastic vessel meant for single-use, I’d tell him it was for “a project”. Last week, I finally made good on that promise.

To make your own concrete planters, you will need:
A bag of concrete (I used a 10lb bag)
Sand
Perlite (to make the concrete a bit less heavy when dry)
Water
Assorted plastic containers with relatively straight walls, to shape the pots
A bucket
A box cutter or X-Acto Blade
A sturdy stick or large twig for mixing


I started by collecting all of my reserved plastic containers, cutting any tapered tops off and then nesting smaller plastic containers inside larger ones (ideally, leaving about a half an inch of space between the two.)
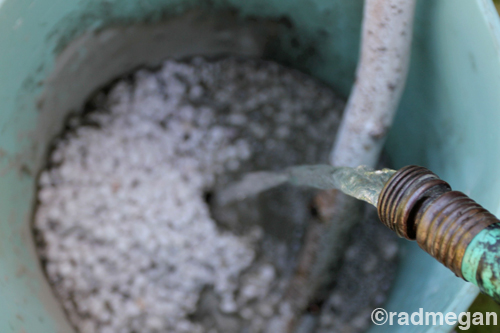
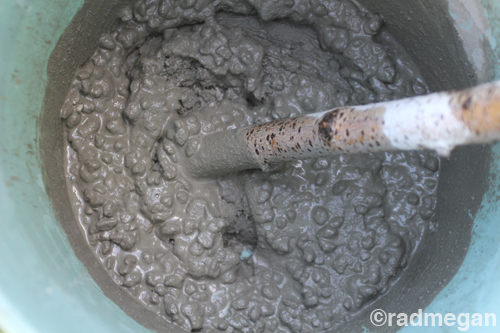
Next, I made the concrete (in my bucket) per the directions on the bag- this used a bit of sand, water and perlite, and my trusty all-purpose stick for mixin’!
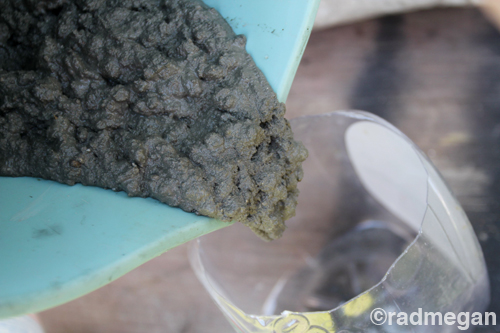
I worked quickly, thinking about how cement trucks rotate to keep the gray sludge from hardening. I poured the wet concrete into my orange juice container and filled it about half way. The amount you pour in, will depend on how large your inner container is. My inner plastic container was so large, that it left only about 1/3 inch between the outer plastic and the inner plastic walls. And note that when you push that smaller plastic container into the wet concrete, you want to keep about 1/2 inch of concrete UNDER the inner plastic pot. A flimsy foundation will contribute to your concrete planter falling apart!


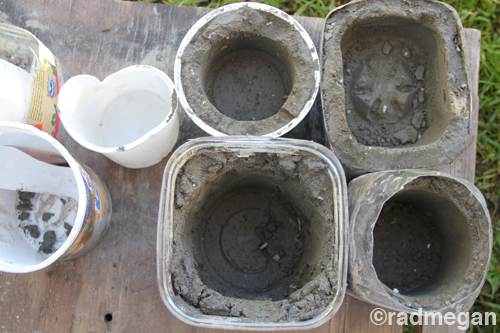
When the first container was filled, I used the rest of the wet concrete to fill my other three containers. I ended up using (clockwise from the top right: A Crystal Geyser 1 gallon water bottle with a large yogurt container inside it, a 1- gallon Tropicana OJ container with a 64oz Ocean Spray cranberry juice inside, a 1-quart Tropicana OJ bottle with another large yogurt container inside, and finally a Greek yogurt container with a small frosting container inside of it.

I let the concrete harden overnight and the next morning I bent, pulled, tugged and cut out the center plastic containers to expose the interiors of my concrete pots
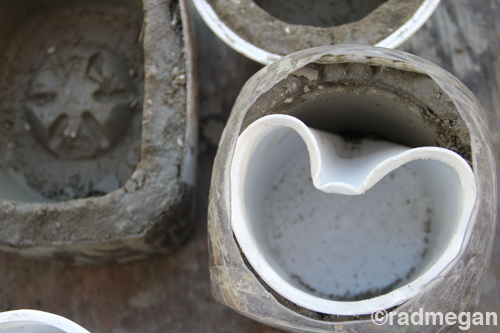
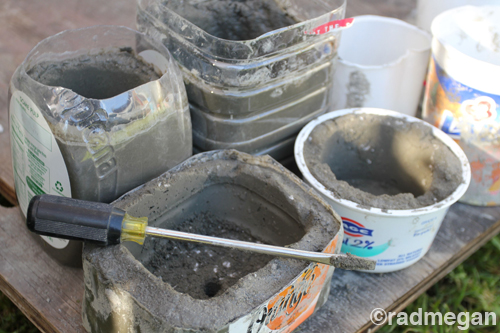
When all of the plastic containers had been removed from the centers of my planters, I noticed that A.) one of my containers (the Ocean Spray 64-ouncer) had a shape in it that caused a large hump in the base of my pot. Not only did I NOT want that, I also HATE pots that do not have drainage holes. Planters NEED drainage holes. Luckily, my concrete had not fully set, so I took a screw driver, and scraped away the hump shape.


Then, using that same screwdriver, I hand-drilled a single hole in the base of each (not-quite dry) concrete pot.
I was so excited about my concrete pots! I couldn’t wait to see them! In fact, I was a bit too anxious. I pulled off the outer plastic container a bit too soon…

…and the entire thing cracked and crumbled in my hands. Lame. I went inside, made a cup of tea, and should have decided to let my remaining 3 pots cure in the sun for another day before I removed the outer plastic containers.

But after my tea, I came back outside and SO CAREFULLY, removed the plastic from the last three pots.

I’m actually glad I did, because my favorite pot (the 1-quart OJ) had a teeny trace of the logo still imprinted on the side of it, and since the concrete wasn’t quite dry, I was able to scrape it away with the backside of my thumb nail.
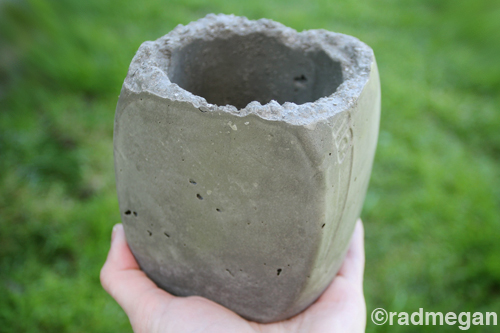
I let all three of my concrete pots cure completely (three days in the sun on the driveway to be SURE they were fully dry) and then…
POTTED THEM UP! I was so, so, so pleased!
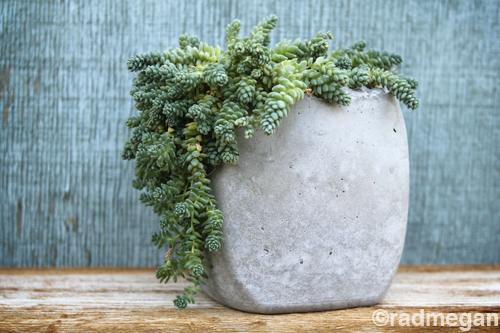
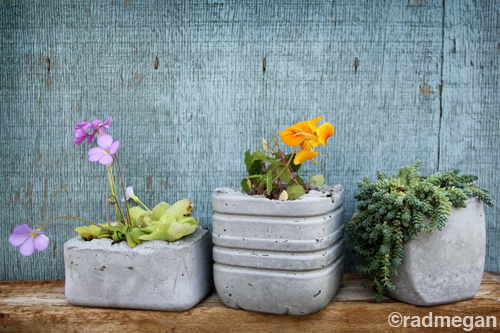
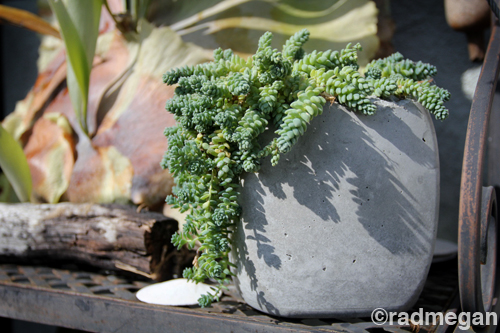
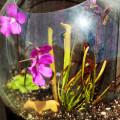
My 1-quart OJ container had transformed into a modern succulent planter!

My gallon-sized OJ was now a long and low carnivorous plant container!
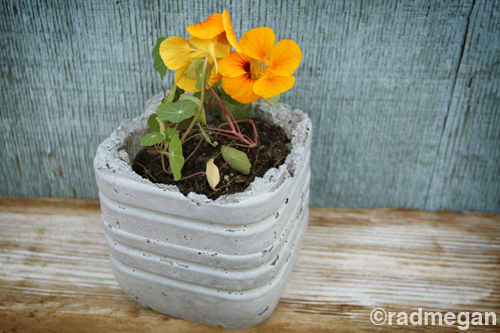
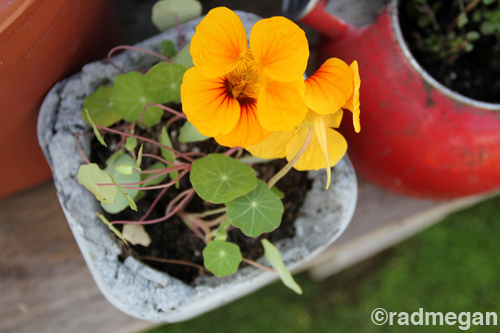
And my 1-gallon Crystal Geyser water bottle was now a textured pot for some bright (& edible) nasturtium flowers.

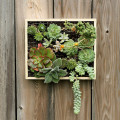
I placed my concrete planters around the garden. I think I’m going to have to invest in a MUCH larger bag of concrete soon because I cannot WAIT to do this craft again! I loved the results and hope you do too! Will you be making these concrete planters for your balcony, porch or garden?


these look so great! i’ve always wanted to do this but didn’t think about doing it on a small scale….adding it to my list!!
Those came out great! Thanks for sharing the tutorial.
Thanks Devon! I was also thinking that I’d start out w/ large planters, but I loved the ease of the smaller ones. The next batch will be made with moss spores in them… living containers for my plants!
And thank you Multiples Mom! Let me know if you try them out
xoxo
radmegan
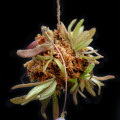
I’ve always loved the look of these and I’m definitely trying them this year. Can you tell me what succulent plant you planted, I’d love to use that one in mine!
I think it is called “Donkey’s Tail”…just bought one at Lowe’s last week.
https://www.google.com/search?q=donkey's+tail&hl=en&prmd=imvns&tbm=isch&tbo=u&source=univ&sa=X&ei=YlmqT7eWGMKTgweyprTEAQ&ved=0CIIBELAE&biw=1600&bih=767
I would love to incorporate this as a school activity, how heavy are they withe the sand and perlite? I shall try it out first but I need something my older mother can move and manage when I put herbs in.
Your pots turned out great! If you add peat moss to the mix, you get a kind of fake stone called hypertufa — it’s more porous, so it’s good for pots. Also, you can add some interesting textures by unmolding the outside after a day and lightly using a wire brush on the surface.
Cool! I totally would have tried un-molding mine too soon as well.
Love this! What a cool idea!
Megan, I LOVE this project and what a perfect time for it—just as summer approaches. -random nicole
You are the crafting maniac! I love how your concrete planters turned out! My husband received one as a gift a few years ago and that was the first time I took notice of that modern approach to planting. I am with you on drainage holes, by the way!
I have to make some of these!
Another way to create a drainage hole would be to cut an “x” in the bottom of the plastic inner container and insert a dowel rod through it to the appropriate depth and then press it into the wet cement.
But the cement might adhere to the wood? Maybe cover it with a piece of plastic wrap so it will come out when it’s all dry. Or use a small plastic pill bottle in place of the dowel. Just thinking out loud.
Thanks for the warning about unwrapping too soon! I’ll leave these in the sun & try to forget about them.
Jan
I was wondering about this, too. Maybe a straw? I suppose a McDonald’s straw would be about right. Perhaps you could create several small drainage holes this way. If you have any friends whose kids have outgrown their Tinker Toys (the newer, fat plastic ones, not the classic ones that we knew as kids), this would also be a good use for those sticks!
Hi,
You could use a dowel sprayed with WD40, or rubbed with diesel – concrete won’t stick to that, especially if you rotate it from time to time…
LOVE! These look awesome and I’ve been wanting to make more for a long time (the diy-wish-list is really long with a 2-year old). I second the comment about hypertufa. I have three on my porch that I made a few years ago and they age beautifully, they’re light weight, and cheap to make (except they take a lot longer to cure and crumble like a mud pie if you unwrap them too soon). I used a couple glass nesting bowls for the molds, wrapped in saran wrap and brushed with a little veg oil to help unmold. One of the smaller bowls was intentionally really off set in the bigger bowl so you get an asymmetrical round planter. So many fun things to do with cement.
you could use cut pieces of wodden dowels for drainage holes. just take a drill to the wood after the cement dries
Great idea
Well. I know what project I’m doing this weekend. Having little money to spare on fancy planters this is a fantastic alternative. It looks pretty slick when finished, too.
Cheers!
Ash
Love this, very clever! Do you think it would be possible to colour the cement?
Yes, you can buy cement color in the same place cement: usually dark red, gray, brown. final color depends on how much is mixed in.
M
Also, you may want to use a coating to make removal easier, especially if using wooden molds: http://www.ehow.com/how_6582641_diy-concrete-form-release.html
M
Really wonderful stuff… Although I think, without a wire-frame I guess larger structures won’t hold together for long…
I used some old wood stain on a concrete vessel and it turned oit great. I’ve bee thinking about mixing the stain into my concrete before pouring, but haven’t tried it yet.
Great idea!
I work in decorative-type concrete and would just add that whatever you can do before the concrete is dry will be much easier.
-Molding a weep hole in, with a dowel as noted above or with straw filled with sand (when cured, letting the sand out would make the straw easy to remove) is a great idea.
-Also, a coating of cooking spray like PAM will make mold removal easier.
-If you have a palm sander, holding it up to the sides of your molds after the concrete is in will vibrate the air bubbles up and out, if you want a smoother look to the sides. It will also settle the tops down pretty flat.
-You can replace some water with latex paint for coloring. (less is more)
-If it is especially hot and dry out, you may want to cover the tops with plastic while they cure to avoid cracking.
-Not a huge deal, but remember that silica and portland cement (elements of concrete) are not fantastic for you to breathe or have all over you, so gloves and good ventilation/dust mask while mixing are a good idea, especially for kids or people with sensitive skin.
Something to keep in mind, concrete does not “dry”, it cures. It is a chemical process that required moisture be retained. On warm, sunny days, the concrete should be kept in shade and even covered while curing.
You will get a more durable concrete than if the moisture evaporates and rests the chemical process prematurely.
Great project though
This project inspired me to find a large planter form.
This is Awesome! Almost every year I have to think up a good idea for the kids to do for Mother’s day~and I’ve run out! Can’t wait to have my Hubby and daughter whip a couple of these up for me! Thank you so much for sharing all tips and no~no’s ~will save a lot of frustrations I’m sure
To add to the suggestions above:
– I’d paint the inside of the pots with something, as the soil will gradually increase in pH over time. Might not be an issue with annual plants, but more longer term….
– There are some great oxides you can mix in. As suggested above, less is more…
– Pearlite can be substituted for vermiculite if thats cheaper in your area. Or bean bag beans if you are game.
I am making these pots this weekend. I plan to add tile to the top edges while the cement is wet. I also thought that I would stick tile to the sides before i place the cement in the container. Was thinking of ways to do that, I am thinking tape.. but will try different stuff. It must adhesive to stick to the container, but not permenantly.
I am going to give these bling. When to 99 cent store for cheap molds in their plactic bowl section.
Can’t wait to try this. I am add spagnum moss to the mix instead of perlite.
I will add more ideas as I think of them.
I made a cement pot last year with left over cement from another project. Wish I had sprayed both internal and external pots with PAM cooking spray. Water, applied to the external pot released the pot easily. Would not do that to internal pot, as it would add water to the mix and that would ruin the drying process. PAM would be the answer.
Colorant can be purchased to change color of cement to any color. Latex paint I heard works, but I will give it a try.
I was going to paint the inside of the pot with some sort of heavy paint so the leaching of cement chemical doesn’t hurt the plant, or cause stains on the cement.
The plant in my pot from last year is doing well, and has not been effected by the cement.
More later
I so did this but I did spray the sides of the containers with pam. I added peat moss and coconut husk (used for containers plantings. I shredded those and mixed the peat moss with concrete. I think they came out so light and beautiful. Thank you for this because now its time to do gigantic pots!
great post
great visuals, I have tries it in my home and it is really superb
I was just wondering about plastic being molded and used in the same way that you have used
cheers
Interesting information I haven’t been through such information in a long time.
playstation4
some of the best instructions I have seen for the DIY project, Thanks
If I may add a tip, I suggest staining your cement to add some effect to your planters. I have to warn you, though, that it may be a bit challenging at first because you need to create a precise mixture. Nonetheless, your DIY project looks simple and easy to follow. Nice guide!
Concrete Plants
Very Nice Post.
Good information nowadays.
Thanks for sharing with us.
These are really cute! Thanks so much for the great tutorial!
Hi. I just made a larger one this weekend. However, the top came out glossy. I wonder if it’s because I put a plastic bag over the top so bugs or dirt wouldn’t land on it. I love how yous has the little holes on the side. Too cute! I used vaseline on my container so it would come out. I’ve heard spraying PAM also. Do you really have to do that? Will it get stuck? Christine cduval@flytucson.com
really nice concrete designs.
Great diy concrete planter…minimalistic style that i love. I think it will be a great add on in my village’s garden
Concrete planters are made using a small container and a large container as molds. How far you push in the interior container will affect the thickness of the walls of your finished concrete planter.Your post is very informative and this project inspired to find a large planter form.
Oh!! nice!! This is an amazing idea! Thank you for sharing it with us!
I found a round shaped concrete container about 24″ diameter and same depth sold as a very expensive river rock filled fountain costing $400. I fell in love but the cost is way over my DIY budget so plan to make my own! Will experiment making smaller ones first to develop the technique. Thank you for inspiring me!
I absolutely love this, guess what I’m going to do tomorrow? I found another site where you put pea gravel or river rock in the concrete I’ll see if I can find it and send it to you. I was wondering about painting them or stenceling on them, I want to make a shorter one that’s a bit bigger to make a fairy garden. I am obsessed with them…. lol..
Hi, I have tried this a few times and some of my pots from the same mixture have a chalky, sandy finish and other have a smooth finish. Could you please explain why? I much prefer the smooth finish. Thank you.
Lovely design. Concrete is really versatile and malleable. Some concrete designs can also be done on floors but you need cutters to do them. Some companies provide this service.
Hi, your containers look so good; how long do you let them dry/cure for altogether? Do you cover them with plastic bags to keep them moist, or is this not necessary?
Thank you for any help; it’s nice to create things yourself….
I wonder if, when you remove the outer container, you could do a bit of carving on the surface? I’m thinking yes, if it was done oh so gently?! Worth a try.
Gail, this is a little late but I wanted to pass this along. I have a friendwho does exactly what you want to do. She waits until the pot is hard enough for the form to come off then carves the side with utensils from the thrift store. Keep the carvings bold andsimple, detail will not show. Depending on the look you are going for the design can be lightly tinted with diluted craft paint. My friend does leaves and natural objects as her inspiration thenuses very pale tints of sage green and brown to bring out the highlights. When you finish wet the pot down and cover it with plastic. The concrete is getting stronger as it incorporates water into its structure. For home use this curing will take at least 48 hours to hold its shape but only handle in on a piece of plywood so there are no twisting stress due to liftiing. Good luck.
I would also spray non-stick cooking spray in and on the containers. Helps the removing process and makes it much easier.
In the basement we have moisture and there is mold every week, so I deal with it a lot. Usually I am cleaning it with bleach but I just can’t stand the smell! I will definitely try to clean it with some of the other products like Borax for instance!
Thank you for sharing. It’s very useful. Hope to hear more from you.
¡Fantástica idea! Gracias por compartir
Just because you have concrete at homes doesn’t mean you can’t make it look good. There are contractors that will deal with that.
I agree concrete is cheap to buy and mold into pots. I enjoy visiting the site that shares methods of creativity in gardening. Thank you for sharing.
Wow, what a fantastic post! Your enthusiasm for gardening and creativity really shines through. I loved reading about your journey in making your own concrete planters. The way you repurposed various plastic containers and carefully poured the wet concrete showed great attention to detail.