• Home
  • About Megan
    • Student Gallery
  • Writing
  • Video Training
  • Knitting Fork Projects
  • Categories
    • Baby Crafts
    • Baking
    • Book Review
    • Camping
    • Cooking
    • Crafts
    • Etsy
    • Gardening
    • Guest Blogger
    • Holiday
    • Kid Crafts
    • Knitting Fork
    • Needle Felting
    • News
    • Photography
    • Recipe
    • Sewing
    • Teaching
    • Travel
  • Sponsorship Info
  • Contact
  • March 25, 2023
Gardening Recipes
 
Craft Projects Photography

D.I.Y Cupcake Candles

January 23, 2012 By radmegan 3 Comments

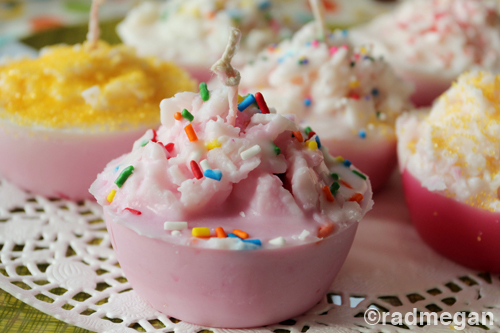
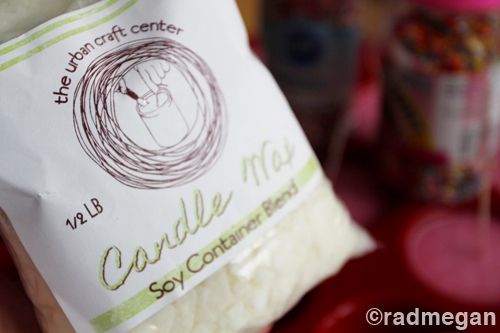
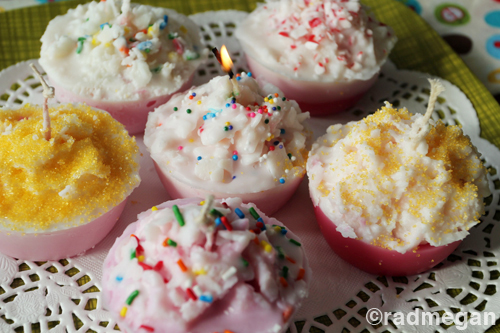
I just recently came up with this “recipe” for cupcake candles when I needed to put together a craft for a kids’ birthday party. This craft was a HIT with the kids because everyone got to decorate their own candle with the wax colors and real sprinkle toppings of their choice- and the wax wasn’t too hot for little fingers. I think they are really stinkin’ cute for any age, so here’s how you make ’em!

=”clear:>

1 pound block beeswax
1/2 lb bag soy container blend wax
1 spool cotton wick
1 package metal wick bases
Pliers
Scissors
Non-Stick Cooking Spray
Silicone cupcake pan- OR 1 package cupcake papers
Assorted sprinkles 
Double Boiler
Tape
Optional- Hot Glue Gun
Step one: Cut lengths of the cotton wick long enough to reach through the height of a frosted cupcake (about 3.5 inches long. Take one end of the wick, and run it through the metal wick base. Pinch the tube of the metal wick base with pliers to secure the cotton wick.
Step two: Take your threaded wicks and your hot glue gun, and put a dab of glue in the center of each baking cup, then place your wicks on each glue spot. This will help prevent your wicks from floating away when you pour in the hot wax. 

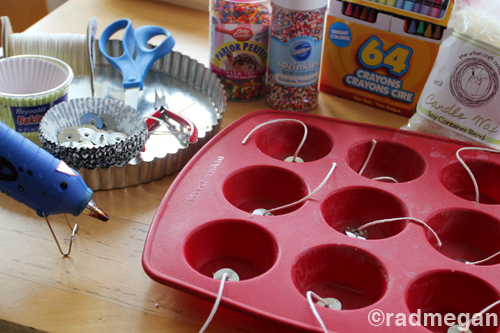
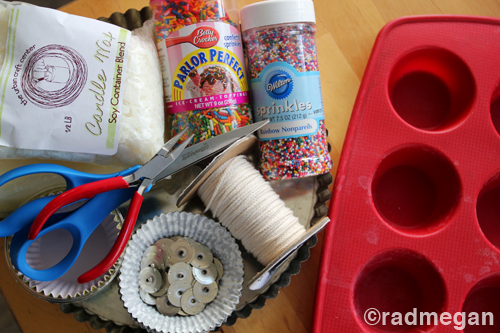
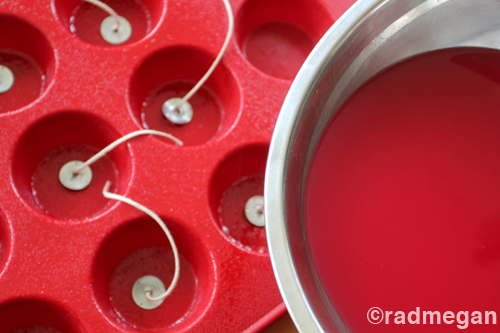
When the wicks are all glued in placed, take your non-stick cooking spray, and give the entire pan a good spritzing. This will help you pop your candles out of the mold without any trouble. If you are using cupcake papers- you will want to spray the insides of those as well. 

Step 3: Place the block of bees wax in the double boiler (or a regular old sauce pan full of water with a metal bowl placed on top.) I like to use a silicone spatula to help the wax melt evenly.

To give my cupcake a pink look, I unwrapped a fuchsia crayon and dropped it into the double boiler with the melting block of wax. Using metal tongs, I removed the crayon after only a few second. Apparently, crayon wax is a mighty powerful color additive! I would recommend 1/4 of a crayon to add color. 
  
Step 4: When the wax had completely melted, I poured it straight into the individual cups of the silicone cupcake pan- leaving about a quarter of an inch from the top of the cup. Be sure to wear oven mitts for this stage, as the metal bowl can be hot. Also- be mindful of the condensation on the bottom of the bowl- the steam from the saucer below builds up, and if the water drips into the wax, it can create ugly pock marks. Wipe it up and keep pouring the wax!
Step 5: While the wax is still hot and liquefy, set the sprinkle containers between the cups of wax, and tape the wicks to the sprinkle containers so that there is no slack in the wick. Let the wax cupcakes cool completely. Remove the tape from the wicks and let them fall freely.
Step 6: Take the Soy Container Blend Wax (or any other wax shaving you have) and place them in the double boiler for only about a minute or so. To add color to this “frosting” break off a little more crayon and mix it into the wax flakes. 
Step 7: Pour the semi-melted wax flakes on top of the solid cupcake bases. Use a spatula or your fingers to mound the candle wax flakes up towards the center of the cupcake. Give the wick a tug to make sure it is taught in the center of the frosting.

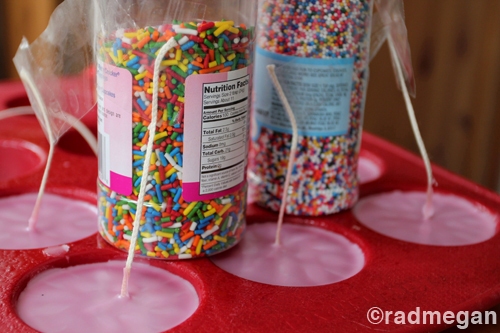
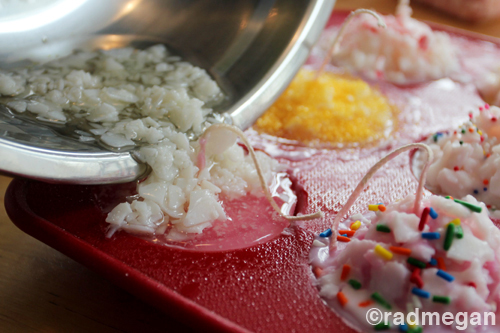
While the wax is still wet, generously shake out sprinkles over the cupcake candles! Homemade cupcake candles are an awesome way to add a personal touch to any party or get-together!

And they are a great craft to do with kids: be sure to supervise the hot wax while it melts in the double boiler and then ladle it into the cupcake bases for them. The top, partially-melted “frosting” wax is cool enough that they should be able to mold with their own hands. Just test the temperature first to be sure! 
In fact, just this weekend, I taught over twenty kids, ages 10-16 (see their creations above,) how to make these cupcake candles and every single one of them said that it was the most fun craft they had ever done!

Helpful notes on cupcake candle making:
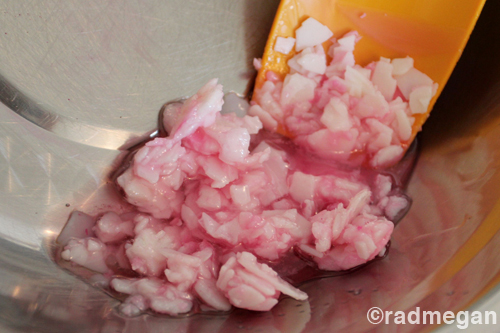
When the candle-making fun is done, place your wax-coated bowls, spatulas etc into the freezer for about an hour. The wax will easily chip off once it’s frozen. Collect the wax bits that scrape off and save them for your next project- they will melt down again and again!

Also, if you have existing pillar candles that are half-melted, you can always re-melt them in a double-boiler and use them for brand new projects! It’s a great way to up-cycle. 

And always burn your candles on a saucer or plate to avoid hot wax from dripping down to the surface below. 


FacebookTwitterGoogle+PinterestShare

Related posts:

magazine+cupcakes+copyPom-Pom Cupcakes for Kids Craft 123 Knitting Fork Project: Easy Knitted Hearts Craft Tip: Embroidery Transfer IMG_2324"Sparkle Ponies" (or Making a Glittery Unicorn) 5585261905_33d5d3f00aPlaying Dress-Up with Fancy Felted Jewelry Getting Inky for Emberley

Filed Under: Kid Crafts Tagged With: birthday crafts, candle cupcakes, candles, cupcakes, Kid Crafts


Warning: count(): Parameter must be an array or an object that implements Countable in /webroot/r/a/radme001/primary/www/wp-includes/class-wp-comment-query.php on line 399

Comments

  1. Abigail says

    May 7, 2021 at 2:31 am

    hey there, I wanted to ask if it is possible to make it with paraffin wax and is it possible to know where you bought the cupcake molds.

    Reply
  2. Amina Akter says

    December 17, 2022 at 2:05 am

    I love a good-smelling wax melt. Lovely post.

    Reply

Trackbacks

  1. 6 last minute DIY Christmas gifts ideasCoolAllure - Lifestyle - CoolAllure says:
    December 20, 2015 at 9:07 pm

    […] your friends ans gifts! And please let a note such as “do not eat ” or something :))  Here are the instructions of how to make the super cute […]

    Reply

Leave a Reply Cancel reply

Your email address will not be published. Required fields are marked *

CommentLuv badgeShow more posts

Follow Me

  • 
  • 
  • 
  • 
  • 
  • 

Find posts on this blog about…

Instagram

Get posts via email

Welcome!

I'm a crafter, cooker, gardener, and photographer.
Read More...
Learn Craft Photography with Radmegan

Friends

back to top
© Megan Andersen Read. All rights reserved.
Interested in using my photographs? Contact me.
Web design by Hearts and Laserbeams