• Home
  • About Megan
    • Student Gallery
  • Writing
  • Video Training
  • Knitting Fork Projects
  • Categories
    • Baby Crafts
    • Baking
    • Book Review
    • Camping
    • Cooking
    • Crafts
    • Etsy
    • Gardening
    • Guest Blogger
    • Holiday
    • Kid Crafts
    • Knitting Fork
    • Needle Felting
    • News
    • Photography
    • Recipe
    • Sewing
    • Teaching
    • Travel
  • Sponsorship Info
  • Contact
  • June 16, 2025
Gardening Recipes
 
Craft Projects Photography

A Faux Bois Paper Frame for Valentine’s Day

January 18, 2011 By radmegan 15 Comments

I adore my husband. He’s the greatest man I’ve ever known and my perfect match in nearly every way. When Valentine’s Day rolls around however, I never want to buy him anything because he thinks that V-day is a “made up Hallmark card holiday” and a complete waste of money.
Me? I can’t help it. I’m a natural-born gift-giver. And on VALENTINE’S DAY, I relish the opportunity to tell my loved ones just exactly how loved they are. Since February 14th is just around the corner, I’ve started working on homemade gifts that say, “I’m crazy about you, but didn’t spend any money on you.” Thrifty, sensible, thoughtful. Yay.

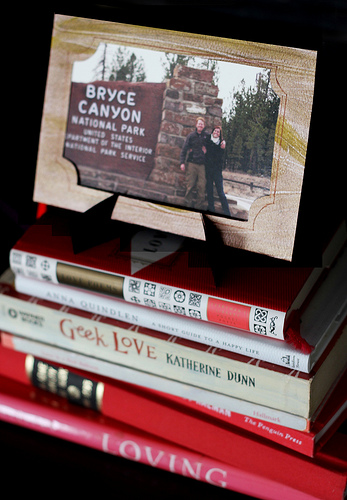
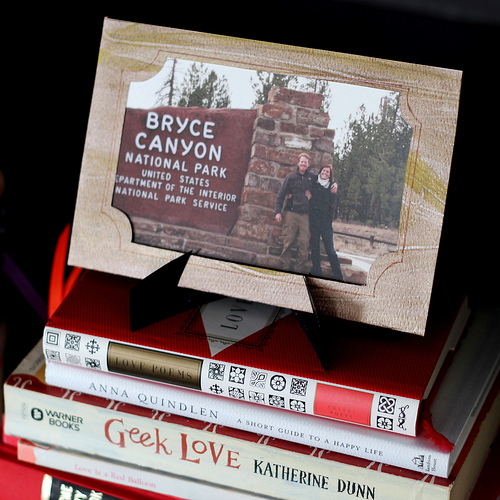
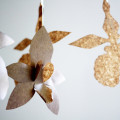
The first of these homemade gifts, is a wood-grain paper frame with stand.

I’ve admired wood grain on paper products, fabric, and even carved into yummy desserts. I never tire of it. I LOVE wood grain and thought that painting it onto a paper frame would make my hand-made gift that much cuter.

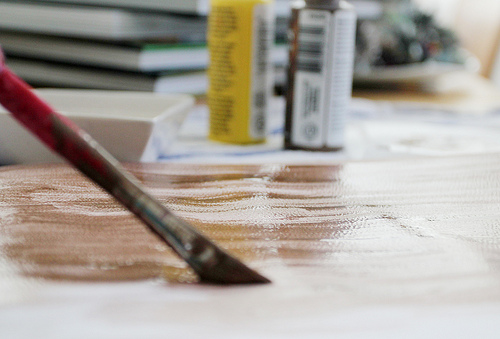
I grabbed my trusty pad of watercolor paper, two containers of acrylic paint (a metallic brown and lemony yellow), and a saucer of water. With wet strokes, I painted on an uneven layer of brown, and ran some yellow streaks through it. The nice thing about painting wood grain, is that you don’t need to be terribly careful with your strokes.

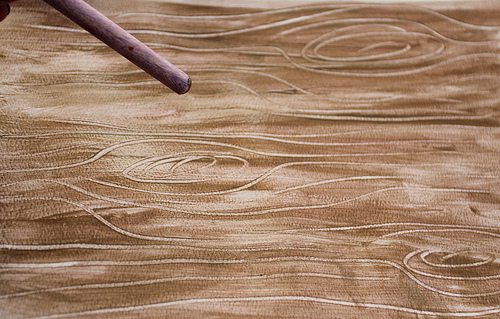
After painting the brown and yellow base, I washed my brush and flipped it around so that the bristles were pointed towards the sky. With the wrong-end of the paint brush I drew uneven, but parallel lines into the wet paint. I added a few “knots” in the wood by drawing in ovals and tracing them loosely, and presto: we’ve got wood! Let the paper dry for a spell and repeat this technique on the backside of your paper.

After the paper has dried completely, grab the photo you would like to frame and the following:
A pair of scissors
X-Acto knife
Tacky glue
Markers
Cutting board
Clothes pins (or a chip clip.)
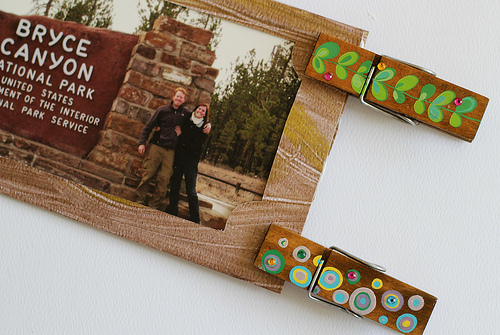
Fold the painted paper in half and slip the photograph inside the fold to get an idea of how large you would like your frame. I was framing a 5×7 photograph and wanted my frame to be about the same size- if not slightly larger.

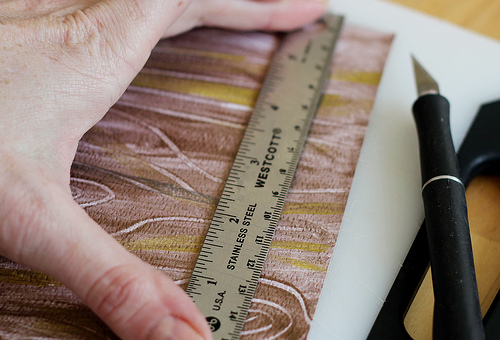
I measured out a rectangle on one side of the folded paper (where the photograph would peek through) and drew convex rounds in the corners to give it a little extra design element. I removed the photograph from the inside of the fold, unfolded the paper and placed it on the cutting board. With my X-Acto knife, I carefully cut out the rectangle. I folded the paper again and slipped the photo back inside the card to make sure I was happy with the size.

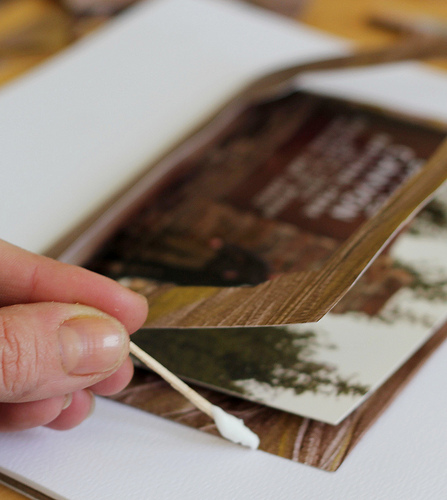
With a toothpick, I applied Tacky glue around the edges of the frame and pressed the edges together- securing them with clothes pins.

Once the glue is dry, you can trim up any uneven ends, or add accents to the frame by using a brown Sharpie to draw in matting lines, or cut strips from the painted paper to create the illusion of depth.
To make the frame stand, trace and cut-out the shape above on another piece of watercolor paper and color both sides with a marker. Fold along the dotted line, and your stand is done!
I love framing photos from old road trips, birthdays and holidays. It’s a great way to remind your loved ones of all the fun you have together, and a cheap way to show them how much you care.

Thanks for reading!

FacebookTwitterGoogle+PinterestShare

Related posts:

Photography Tip: Make-Shift Macro Paper Orchids for an Engagement Shoot Looking Back at Craftcation 2013 5479607502_55d2f6504aPhoto Saturday: Greenhouse at Night 2329724287_6ab31605aaPhoto Saturday: A Self Portrait in Copper 4904613153_510f00eac6Eating out: Korean food at Ondal 2

Filed Under: Photography Tagged With: budget-friendly gifts, Faux Bois, frame, Love, paper crafts, Photography


Warning: count(): Parameter must be an array or an object that implements Countable in /webroot/r/a/radme001/primary/www/wp-includes/class-wp-comment-query.php on line 399

Comments

  1. Anonymous says

    January 18, 2011 at 11:20 am

    Love the idea, love the faux wood, love bryce canyon! You are rad, radmegan!

    -laura B.

    Reply
  2. radmegan says

    January 19, 2011 at 12:08 pm

    Thanks Laura!! xoxo

    Reply
  3. Sharon says

    January 19, 2011 at 4:15 pm

    I love the woodgrain look and think that paper stand is awesome! This project will be tucked away for future use~

    Reply
  4. radmegan says

    January 19, 2011 at 4:58 pm

    Thank you Sharon :)

    Reply
  5. jek-a-go-go says

    January 20, 2011 at 2:23 pm

    and you did it again! i’m seriously slacking, i have something similar in the works. wood grain, but not painted. i’m still doing it though, so there! back to the ironing board. no…really, i’m ironing right now. LOVE THIS!

    Reply
  6. radmegan says

    January 20, 2011 at 2:38 pm

    Haha @ “so there!” Jek, you better post it! I look forward to reading about your awesomeness. Have fun … ironing… O_o

    Reply
  7. The Creative Muslimah says

    January 24, 2011 at 4:08 am

    This is sooo cute and simple :-) Thanks for the post, Imma try making that stand sometime :-) It’s pretty cool 😀

    Love,

    TCM

    Reply
  8. The Creative Muslimah says

    January 24, 2011 at 4:14 am

    This is great!! Thanks for the post, it also seems really simple to make!! :-)

    Reply
  9. radmegan says

    January 24, 2011 at 6:29 pm

    Thanks so much TCM!! xoxox

    Reply
  10. a. b. says

    January 25, 2011 at 8:21 am

    I want to refinish an entire piece of furniture like this. Too cute.

    Reply
  11. radmegan says

    January 25, 2011 at 1:19 pm

    Ooooh great idea a.b.! Send me a link to your finished piece when you do!

    xo

    Reply
  12. fodotort says

    April 1, 2011 at 11:17 am

    Couldnt agree more with that, very attractive article

    online pharmacy

    Reply
  13. pevelent says

    April 7, 2011 at 11:27 am

    Great read! I wish you could follow up to this topic

    aroma essential oils

    Reply
  14. Rachel says

    October 4, 2015 at 3:40 pm

    Thank you. I cannot describe how grateful I am towards your post. A major school project of mine is due in a week and I haven’t really got any ideas of how to display it yet. And once I did, something went horribly wrong. But now I do and nothing will go wrong again thanks to this post. :)

    Reply

Trackbacks

  1. Unique DIY Picture Frames to Brighten Any Room says:
    February 2, 2016 at 5:01 am

    […] Radmegan‘s tutorial shows you that paper can be chic too! Some textured card and some paint will do the trick in this tutorial. […]

    Reply

Leave a Reply Cancel reply

Your email address will not be published. Required fields are marked *

CommentLuv badgeShow more posts

Follow Me

  • 
  • 
  • 
  • 
  • 
  • 

Find posts on this blog about…

Instagram

Get posts via email

Welcome!

I'm a crafter, cooker, gardener, and photographer.
Read More...
Learn Craft Photography with Radmegan

Friends

back to top
© Megan Andersen Read. All rights reserved.
Interested in using my photographs? Contact me.
Web design by Hearts and Laserbeams