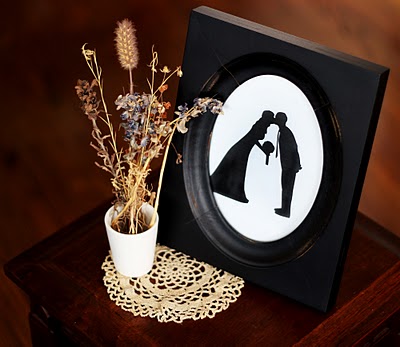
I may be a little late to the party, but I just saw some great silhouette wedding-accents on the greenweddingshoes site, and got inspired to make my own silhouettes based on ACTUAL wedding photos.
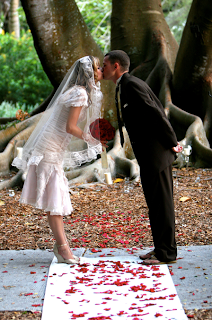
In my own “wedding kiss” photo, it looks like I’m about to inhale my husband’s face, so I went looking for other wedding kisses on Flickr, and found the lovely image above. (Used with permission from the photographer, Andy Graber.)
To make a silhouette of your own wedding kiss photo (which makes a great anniversary gift, or just a lovely graphic to have around the house), you will need the following:
A digital copy of your photo
Adobe Illustrator (just about any version will do)
A Printer
I want to start out by saying that I love Adobe Illustrator and always have. I know that software can be scary for people, but I think that with Illustrator, and in particular, the Pen Tool within Illustrator, learning a few tricks can really bring your crafts to another level. That said, lets proceed!
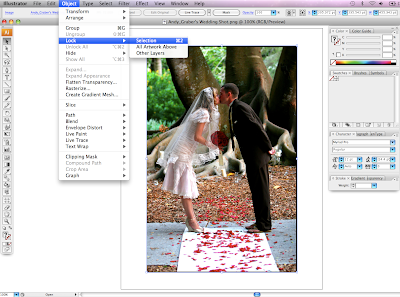
To begin, open your digital photograph (.jpg, .psd etc) or scan within Adobe Illustrator. You can do this by going File>Open, and selecting your image.
When the photograph opens up on the Artboard (your “work surface” within Illustrator), lock it in place by selecting it (clicking the image with the black arrow) and hitting Command 2 (on a Mac. Control 2 on a PC.) The reason I like to lock the photograph, is so I can use my Pen Tool to trace around the figures without worrying about accidentally moving the image below.
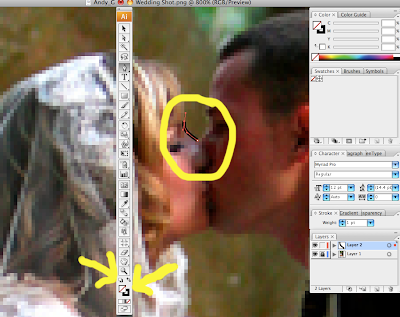
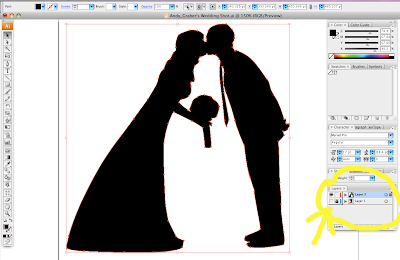
Next up, I create a new layer in Illustrator. This will be the layer we draw our silhouette on. Create a new layer by going Window>Layers to show the Layers Panel, and then clicking the “new layer” symbol (circled above). The layer that is highlighted blue, is the one you are working in. I also like to click the padlock icon next to the eyeball on the layer I will not be working in. This prevents me from accidentally working in a layer I don’t want to be working in.
When I am drawing a silhouette, I usually zoom WAY in so that I can see the fine details of the photograph better. To zoom in, hit Command + (or Control + on a PC.)
Now is the fun part! The actual drawing! To begin drawing, select the Pen Tool from the Toolbox. If you just started click, click clicking the Pen Tool all over the place, you would be creating a line made of Anchor Points (little dots). These Anchor Points are great when you are drawing something with hard edges and straight lines. By clicking and dragging your mouse when you create a line with the Pen Tool, you create Anchor Points that have two Directional Lines on either side. The Directional Lines are like little handles, and they will help you draw curvy shapes (like the bride and groom!)
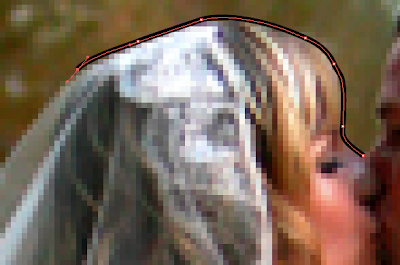
To trace your bride and groom, you will want the Anchor Points and Directional Lines to follow the natural curve of the their bodies. Click and drag the Pen Tool and begin tracing the faces of your subjects. You might notice right away that your default setting on the Pen Tool is a black line (or stroke) filled with white!
This is easily fixed by looking at your Toolbox, and setting your “fill color” to clear- which is the white box with a red slash through it.
With a black stroke, and no color fill, you will be able to continue tracing your subjects without any colorful interference. Be sure to save your work as you go.
Continue tracing your figure. If you get stuck with your anchor points, there are some great Pen Tool tips on Adobe’s website. I usually rough out the entire outline, and then go back and either manipulate the lines by Option-Clicking the Directional Lines, or by adding and subtracting anchor points.
Adding anchor points can be done by clicking and holding on the Pen Tool within the Toolbox, which will show additional drawing options. By selecting the Pen Tool with the addition sign, you can add Anchor Points. By selecting the Pen Tool with the subtraction sign, you can remove them.
Once the entire shape is drawn, click it with the black arrow to select it. The red box that surrounds your drawing is called the Bounding Box, and you can now adjust the size of your drawing or rotate it, by Shift-click and dragging the corners of the box. But first, we want to make the image a true silhouette by switching the fill color from nothing, to black. You do this, by either clicking the tiny arrow next to the color fill box (see arrow below), or by clicking directly on the color boxes and selecting black as your stroke and fill color.
Finally, to remove the background photograph, we need to turn that layer off.
Turning the background layer off is as simple as clicking the little eye in your bottom layer of your Layers Panel. Save your final drawing, and print it out!
It might take a little bit of practice to get the hang of the Pen Tool, but I think it’s worth it! Once you understand how to use Directional Lines, you will be unstoppable!
I hope this little lesson in the Adobe Illustrator Pen Tool wasn’t too mind-numbing. If you have any questions, please feel free to ask! OR, if you would rather learn from a real master of Illustrator, check out any number of books and videos from my friend Mordy Golding.






yer in my head again! i have a “cheater silhouette” project in the works.
Oh JEK! What AM I going to do with you??
I love the pen tool in illustrator. I’m going to try this out with my sisters wedding photos. Cute gift idea for her. Thx!
Robin
very informative content. your site is very well decorated and I love it. I am waiting for further post. Best of luck for your future. I have a IT farm. My services are graphic Design, SEO, Website development and digital Marketing. Hope You will appreciate me.