I love a good pop-up. For me, pop-ups just make everything a bit more fun. So when a friend and I started musing about a family camping trip together, I thought I would send a proper pop-up invitation. Whether we go off into the wilderness, or just camp closer to home, it will no doubt be special and I wanted a card that reflected that. 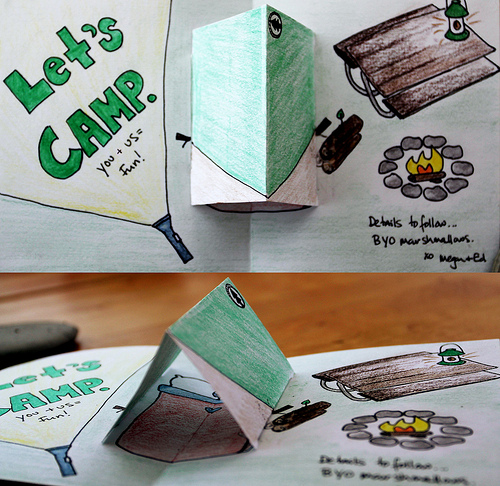
I turned to the book The Elements of Pop-Up (shown below) for help with the exact measurements, as I am MUCH more of an eyeballer. For precision crafts like quilting and paper-folding, eyeballing it doesn’t cut it.
For this pop-up card you will need:
A ruler
A cutting board
An X-Acto knife
3 pieces of thick paper (heavy stock drawing paper, or water color paper)
Glue stick
Colored Pencils, pens, additional card decorations
For this card, I’ve done the measuring for you. Feel free to use the pattern below to make your own pop-up tent card. All of the folds in this tent card are parallel, and symmetrical. Take two pieces of your heavy stock paper. Fold one in half and set aside. With the other piece, trace and cut out the tent shape, then fold down the center as shown. Once you have cut out your tent shape, insert the rounded-edge tab of the tent into the slot on the card, and glue down. When the glue has dried, and your tent is secured firmly at one end you can start decorating the card. If you want to draw anything inside the tent, like a sleeping bag or raccoon, for example, you will want to do this BEFORE you glue the other side of the tent flap down.

After you have decorated the inside of the pop-up card to your liking, take your third piece of paper, and on the right hand side, draw the cover of the card. This will fold around the back of the pop-up, hiding the glued-down tab, and making your card look clean and feel sturdy. Attach your drawing with the glue stick, and fold in half again. You should now have a basic pop-up card that will amaze and please you and your friends! Good luck and happy camping 


I like the idea of this pop up card, it is unique and unexpected. Thank you for sharing this one, this is a great inspiration for my debut invitation.
I love to make some pop-up cards but i dont know how to design it.
I want to design anything in my mind. like a tiger, a effel tower.
Thank for you topic, i will take that book.
Could you possibly send me a template or the measurements please