I am so excited about today’s guest blogger! I’ve known her since I was 8 or 9. She’s like family. Holidays are not the same with out her, her family, and her incredible food. In fact, her cooking and baking skills speak for themselves, so without further hesitation… xoxo radmegan
—————————————————————————–
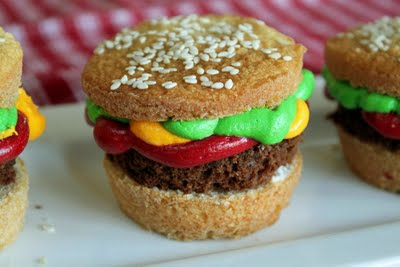
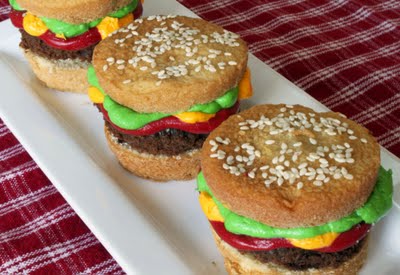
Hamburger Cupcakes
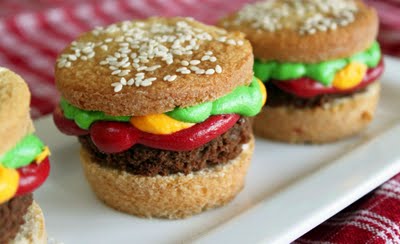
Hi! I’m Mimi, the head cook at Mimi’s Kitchen. The ever-crafty Radmegan asked me to write a guest post for her while she is on her trip. I enlisted the aid of my trusty assistant, Mimi Jr., to come up with a baking post that was not only delicious to eat, but crafty too. We decided to make our cupcake sliders, a fun dessert that’s perfect for summer. Although this is not our original concept (just google hamburger cupcakes to see several variations), we have made them many times. They are easy to put together and are always a hit. You don’t have to be a baker to make these- you could easily use cake mixes and canned frosting if you want an even faster way to prepare these.
What you will need:
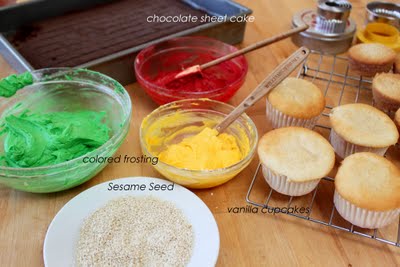
Vanilla cupcakes and sesame seeds for the “buns”
Chocolate sheet cake for the burger “patties”
Frosting tinted green, red and yellow for the “condiments”
Bake your cupcakes either in cupcake liners or in a greased and floured cupcake tin. I like the greased and floured cupcakes, because the sides get nice and brown, just like our homemade hamburger buns. I fill the cupcakes pans about half-full so the cupcakes don’t get a huge domed top, but one that is just slightly rounded like the top of a bun. Sometimes when my cupcakes are too tall I cut a small section out of the middle, so that the top and bottom bun pieces are equal in size. The chocolate cake can be baked in a sheet pan or a 9×13 pan. I use a 9×13 and if the patties seem too thick, I trim them down by taking a slice off the bottom. Every batch is different, so just do whatever looks the best to you.
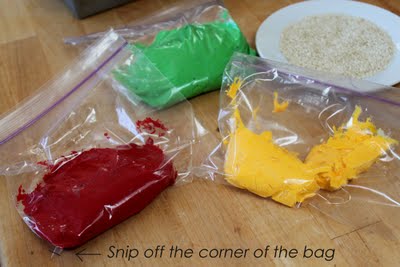
While the buns and burgers are baking, make and color your frosting: Divide frosting into three bowls and tint green, red and yellow. I don’t divide the frosting evenly between the bowls. I use about ½ for the green, and of the remaining frosting 2/3 is tinted red and 1/3 yellow. I use gel colors- and to get my deep red I add a touch of violet to the red coloring. If the yellow is to lemony add a touch of orange to make it more mustard-colored. Put the frosting, along with each color into 3 different Ziploc sandwich bags, squeezing out the air before you seal it. Clip off one small corner of the bag for piping.
You will notice that the butter cream frosting recipe below has a smaller proportion of butter than a normal butter cream. This is because food colorings are water soluble and they don’t color the butter, so if you have a large amount of butter you get streaks of whitish color in your frosting.
To assemble:
1. Slice cupcakes into a top and bottom section. Sprinkle the top of the cupcake with sesame seed, if the seeds don’t adhere dab a little water on the top of the cupcake. If I get too heavy-handed with the seeds, I use a pastry brush to remove the excess water.
2. Using a round cutter the diameter of your cupcakes, cut the chocolate cake into burger patties.
3. Put a small dab of frosting on the bottom of the bun (to hold the chocolate “patty’ in place) and top with your chocolate “patty”.
4. Now add the condiments: Using the red frosting, pipe a squiggle of red around the outside edge of the chocolate cake. Add a few drops of yellow frosting hanging over the red and top with a wide squiggle of green around the entire top of the patty. Add the top bun, gently pushing it into the frosting to make it squish out the sides.
The Recipes:
Vanilla Cupcakes
(Makes about 24)
2 cups all purpose flour
1 ¼ cup sugar
1 tablespoon baking powder
1 teaspoon salt
½ cup butter, room temperature
2 teaspoon vanilla extract
2 eggs
In a large mixing bowl combine all the dry ingredients (flour, sugar, salt and baking powder). Add butter, milk and vanilla. Beat at medium speed for 2 minutes.
Add eggs and beat for 2 more minutes. Pour into prepared baking tins and bake in 350 F. oven for 15 to 18 minutes.
*This can also be baked as a cake in two 8” pans baking at 350 F for 25-30 minutes.
Devil’s Food Cake
Adapted from Martha Stewart Cupcakes
½ cup plus 2 tablespoons Dutch process cocoa powder
½ cup plus 2 tablespoons hot water
1 ½ cups all purpose flour
½ teaspoon baking soda
½ teaspoon baking powder
½ teaspoon salt
6 ounces unsalted butter
1 cup plus 1 tablespoon sugar
2 eggs
2 teaspoons vanilla
½ cup sour cream
1. Preheat oven to 350 F. Chocolate cakes are notorious for sticking to the bottom of the pan so I grease the bottom of a 9 x 13 pan, line the bottom of the pan with parchment paper and then grease and flour the parchment.
2. Whisk cocoa power and hot water to a smooth paste. In another bowl, mix together flour, salt, baking soda and baking powder.
3. Melt butter and sugar in a saucepan over medium heat stirring to combine. Remove from heat and pour into a mixing bowl. With an electric mixer beat on medium speed until cooled, about 4 to 5 minutes. Add eggs one at a time, beating until each is incorporated. Add vanilla and cocoa mixture, mix well.
4. On low speed add the flour mixture in two batches, alternating with the sour cream, and beat until just combined after each addition.
5. Pour into prepared pan and bake at 350 for 15 to 20 minutes or until a cake tester inserted in the center comes out clean.
Vanilla Butter Cream Frosting
4 oz unsalted butter, room temperature
1 lb powdered sugar
Pinch of salt
2 teaspoon vanilla
2+ tablespoons milk.
In a mixing bowl combine the butter, salt and powdered sugar and mix until crumbly. Add the vanilla and 2 tablespoons milk, beat at medium speed until light and fluffy, adding more milk as needed (approx. 1 tablespoon at a time) to get a nice smooth medium-soft frosting.
Enjoy!




Those are too cute!
Mimi jr. has creative, fun ideas just like her mother.
Velva
Mimi, these are too cute. Thanks for the helpful hints about coloring frosting. I didn’t know.
hi mimi! those cupcakes are adorable, and my own buns have increased in size just looking at them. . . .i was wondering, if i were using a mini cupcake pan to make the bun portion, could i also use a mini cupcake pan to make the patties, instead of making a sheet cake and using a round cutter – that way, they’d fit exactly to size?
Anonymous…
Mini chocolate cupcakes would be perfect.
Mimi
These are so cute, Mimi! They’d be perfect to carry to a picnic.
Megan, love your blog!
these are just so cool what a fun guest post and nice blogger to follow thanks Mimi
These are awesome! I’m saving them for next time I have little people over.
how stinkin’ cute! these clearly take a lot of effort to make, which almost turns me completely off (i’m a sloth, after all), but i’ve decided they’re too adorable to avoid. excellent post, mimi!
These are so cute and would be a fun touch at a BBQ.
Adorable! My kids would have so much fun eating these!
Mimi I never get tired of your creativity! These are such cute cupcakes, one would have to look closely to see that. My kids would love these!